Monday, May 15, 2017

SONOLUMINESCENCE: GLOWING WATER


SONOLUMINESCENCE: GLOWING WATER


This is the unedited download of photos and quick notes from my successful quest to create sonoluminescence in my lab. 

Sonoluminescence: if you vibrate water to ultrasonic frequencies (like a jewelry cleaner) you can get bubbles in the water to GLOW IN THE DARK!


I started by poring through the available literature on sonoluminescence, which is meager to say the least. I found that even though most seem to think that a spherical flask is needed-the only sonoluminescence kit on the market features a rectangular flask with hard edges and corners.

People say you need two transducers to make equal but opposite waves to create a standing wave, but I was able to trap bubbles better with a single transducer.

I obtained sonoluminescence with a single transducer located in two different positions (bottom or one equatorial side of the sphere). When the transducer was mounted on the equator, the whole apparatus tilted in the ring stand mount...but I got sonoluminescence just the same!

People say that you need a 25.1kHz or 25.7kHz wave for a 150mL flask. I found 24.23kHz and a few other frequencies induced the glow. Size of flask determines the frequency. Also, according to some: the temperature of the water and the amount it has been degassed plays a part...and that a 100mL flask worked better.

People say that you need a sine wave. Chen, et al found that triangular waves worked best!

People say that you need an oscilloscope to find the resonant frequency of your flask. I used the oscilloscope method, yet found it was faster and easier to just listen to when the flask vibrated much more loudly than before while I twisted the knob on the signal generator.

People say you need to boil distilled water to degas it and that it will ruined after adding a few tiny bubbles, or go bad and need re-boiling after a day or two. I found that it doesn't matter: a bubble is a bubble and water is water.

People say you need to add a single bubble, ever so carefully. I took the eyedropper off of my original elegant design and stuck the tube in my mouth and blew huge bubbles into the flask to prime the flask for cavitation. This worked over and over successfully, over the course of days without fresh water.

So, is obtaining sonoluminescence difficult? No, just as long as you realize with water at room temperature the glow will be extremely dim so that you will not be able to see it unless you're in a very dark room with your eyes dark-adapted for at least 10 minutes. I worked for years in a photographic dark room...when I mean dark I mean no windows, at nighttime and with the door shut and the lights off in the room next to the room you're in: DARK! 

The colder the water, the brighter the glow will be though: around 0° C seems to be the best temperature, as far as the literature is concerned-although as I've already seen, the scientific literature is not always correct.

Another pain: you need to put dark film over your signal generator readout window, and also it's best to build a cardboard box/light-shield around your ring stand to block out stray light.


Basically here's all I did:

Epoxy a 60 watt 25kHz piezo transducer to the bottom of a 150mL spherical flask with a round bottom.

Fill with distilled water and mount in a ring stand. Feed a sine wave from a signal generator to the *piezo transducer and listen until the whole thing vibrates louder (somewhere around 22kHz to 26kHz).

*My signal generator allows me to set the amplitude of the output up to 20 volts peak to peak, even so I elected to add a cheap $15 amplifier circuit board thingy from Amazon: I'd rather blow out an amplifier from Amazon than the output circuits of my signal generator. Even so, I was able to trap bubbles easily without the amplifier and without any need for an addition inductor circuit.

The super awesome $55 signal generator is "KKmoon High Precision Digital DDS Dual-channel Signal Source Generator Arbitrary Waveform Frequency Meter 200MSa/s 25MHz." Note that this goes up to 25mHz (Mega hertz)...but we only need 25kHz (Kilo hertz)! Make sure you signal source can go all the way down to 25kHz (kilo kHz). Some can't get down that low (or high, depending on its main usage).


The cheap amplifier is on Amazon, listed as "DROK TPA3116 Digital Power Amplifier Board 12-24V High Power Amplifier Module 50+50W Power Amplifier Chip with Volume Adjustment Potentiometer Switch Support PBTL 100W".


The 150mL flasks I used were only $5 as an Amazon Prime Add-on, but right after I bought mine the price went up to $45, LOL! "United Scientific FG4260-150 Borosilicate Glass Round Bottom Boiling Flask, 150ml Capacity (Pack of 6)".


The flask I used to heat water (not totally necessary) was "Corning 4980-500 PYREX Narrow Mouth Erlenmeyer Flask with Heavy Duty Rim, 100 mL capacity-500 mL capacity Graduation Range, Rubber Stopper Number 7, 101 mm Diameter". Amazon lists it as taking a number 7 stopper but it does NOT come with any stoppers!

The stoppers for the flask: "Rubber Stoppers - Size #7 - (Pack of 3) Karter Scientific 216R2".


I had the fish tank aerator hose laying around, but the capillary tubes were "GSC International 50001 GLASS Gsc GLASS Capillary tubes, 75 mm Length, Open on Both Ends (Pack of 100)."


The cheap, tiny piezo transducers only used to feed the oscilloscope and totally not needed except for fun were: "15 Pieces - 20mm Piezo Disc Elements with 4" Leads - Acoustic Pickup - Cigar Box Guitar CBG - Touch Sensor." This is what others refer to as their "sensing" piezo.


The other end of the sensing piezo goes to the vertical input of an oscilloscope. Again, this is totally unnecessary-but fun! If you don't have an oscilloscope don't worry: it's easier to just listen to when the ringing of your spherical flask gets way louder and higher pitched at a certain frequency!


The HUGE transducers sold out after I bought mine for about $22 each. On Amazon, just search "25KHz 60W Ultrasonic Piezoelectric Transducer Cleaner Ultrasound Transducer."

Make sure you do NOT get the 40kHz ones...you want the 25kHz ones!  25kHz is 0.025mHz ; likewise: 25mHz is 25,000kHz which is a LOT more than 25kHz.

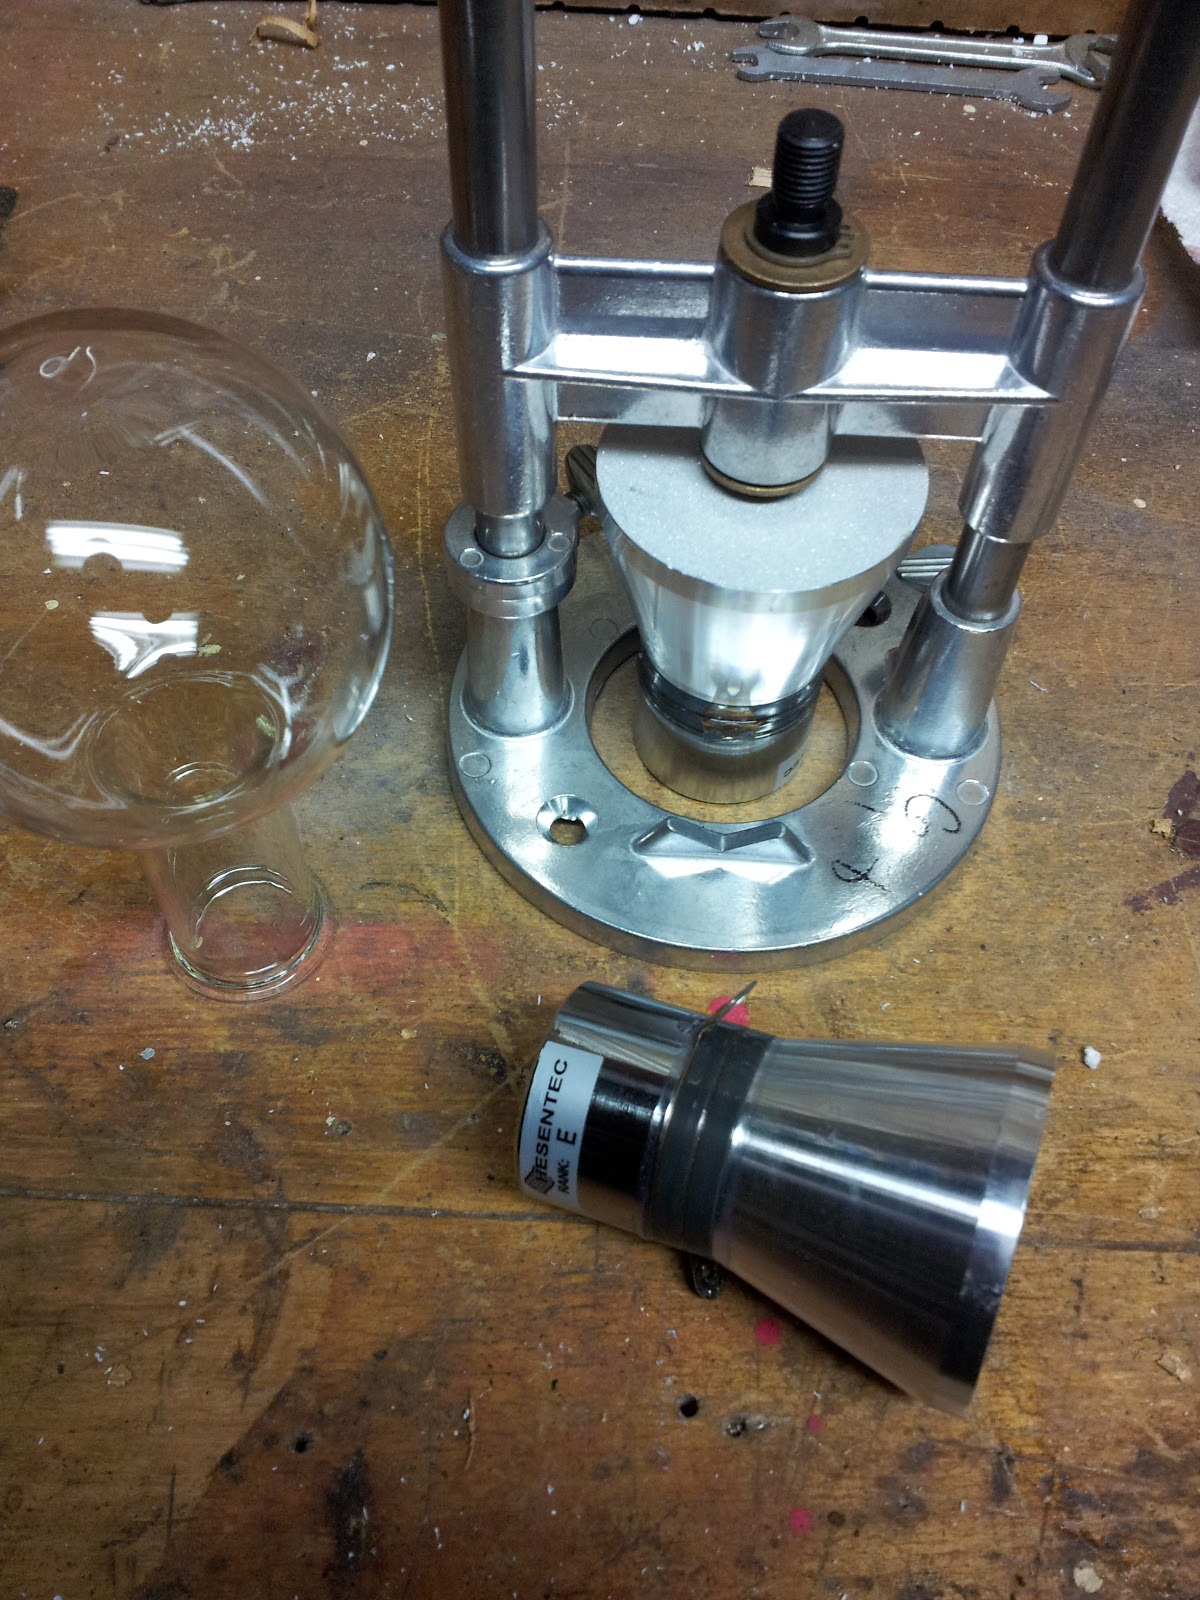
Here are two of these bad boys, one on either side of the sphere! Just a single transducer on one side worked just fine too, but made everything tilt in the ring stand. If you've got just a single transducer: mount it to the bottom of the sphere-it makes everything much easier.


Here is a smaller (100mL) spherical flask that was much easier to trap bubbles in (at a different frequency of course) that also came with an orange stopper and glass tube "Round Bottom Flask -100mL- w/ Glass Tubing and Rubber Stopper - Eisco Labs Borosilicate". I suppose this isn't really needed: you could just use a hose right into the water and skip the glass tube and capillary tube. You can also see the sensing transducer rubber banded to the side of it.


A couple of these wires came in handy, along with some scrap wires to hook up the big transducers to the amplifier "eBoot 30 Pieces Test Leads with Alligator Clips Set Insulated Test Cable Double-ended Clips, 19.7 Inch."


Some of the photos show various more complicated setups. Like my plasma demonstration fusor build, I find that less is more: better, faster, cheaper and easier to operate in the dark.


Fish tank air tube > glass tube > rubber stopper > epoxied in a capillary tube for smaller bubbles. The other end is an eyedropper, which I removed in favor of just blowing into the tube: worked better and freed up my other hand.


I opted to use a cheap little amplifier board purchased off Amazon for less than twenty dollars. The important thing was an AC power supply that could supply up to 5-6 amps! Most power supplies give less than 1 amp.

This power source for the amplifier is on Amazon, listed as "Kastar LCD AC Adapter 12V 6A with 3-Prong Power Cord Power Supply for LCD Monitor and LCD TV". You need lots of amps for this!


I tried the setup without the amplifier and it also worked, but I had to set the amplitude setting on my signal/function generator to 10-15 volts. This made me nervous about blowing the amp section of my signal generator-as opposed to the cheap amplifier board from Amazon.

Absolutely no inductor coil was needed in either setup.


For a dollar I bought a weird piece of equipment. I think it was for a hand-held router, to make a plunging/depth setting? I got it at Disabled American Vets (DAV) resale shop--much like a Salvation Army resale store. I was going to use it as a spare ring stand, but I put a transducer on the bottom, the spherical flask in the center and the other transducer on top: then I added Loctite 1C two-part epoxy and glued everything together.


Please note that Loctite (and may two part epoxies) does NOT like to be glued to previously dried epoxy. If your transducer falls off: you need to scrap, gouge, sand off the epoxy and basically use a new spherical flask (which is why the 6-pack on Amazon was such a great deal). Or you could clean the epoxy off the transducer and mount it on a part of the flask that doesn't have any old epoxy on it. 

Of course, using these devices more and more I've experience failure of the epoxy and tried plain old super-glue (the kind that's the gel so it's easier to apply)! 


Various readings with a cheap Amazon transducer rubber banded to the flask. It was like $5 for a dozen of them. People use them to make cigar box guitars with. They are cheap little disks like you find as the buzzers in smoke detectors (which you can harvest for radioactive AM-241).

As I stated earlier, you can just listen and you'll know when you found the correct frequency, but I wanted to use my 60 year old oscilloscopes for something fun for once.


This is a really adequate sine wave: keep in mind this is measured with the tiny, 75 cent piezo rubber banded to the flask and fed into a 60 year old oscilloscope, LOL. That's why it's sort of leaning backwards. With a litte fiddling you can get it perfect-but who cares, the important thing is that you're trapping bubbles and hearing the LOUD screech. The oscilloscope doesn't really matter.


Here's a photo of one of the cheap Amazon transducers rubber banded to the side: the wires go to the oscilloscope.


Here's the readout on the $55 signal generator. It says 24.95kHz and the amplitude is set to 10 volts. The amplitude in this case is just the "output volume" of the signal generator. Please note that this section of signal generator settings vs oscilloscope was when I was using the smaller 100mL spherical flask and not the 150mL. Either way: use what works with your flask/vessel. You can use rectangular boxes like a small aquarium and it'll be much easier to do the math on your standing waves analysis...plus you can more easily trap TWO bubbles at the same time (each 180 degrees out of phase from each other)...or just do a boring sphere like everyone else :)


Looks cool, but not a nice clean sine wave, LOL! Lissajous lines/figures as a result of odd/even natural numbers, since this Lissajous knot is open it's not a rational number. NONE OF THIS MATTERS FOR SONOLUMINESCENCE...it's just fun to see on the oscilloscope.


Here's something cool I tried that also worked: a neighbor threw away an LG flat screen television because like most LG flat screen TVs the damn LEDs burn out every 8 months. Bummer! Anyway, I ripped out the sound section from the TV and used it as an amplifier between the signal generator and the transducer.


As stated before, the colder the water, the brighter the glow...but room temperature water is just fine too. Here's my flask of water cooling: note that about half the water is gone from the superheating explosion detailed below.


Here's a boring video showing right after the distilled water I boiled got superheated and exploded. Plus and "after" with a toothpick to provide safe nucleation points. Distilled water, or tap water in a smooth vessel can't bubble-thus it doesn't boil. It gets hot (or hotter) enough to boil but doesn't bubble. Then, if you touch the vessel or coffee mug or glass or put something into the water like a spoon, sugar, your lips, the water will all boil at once: a HUGE dangerous bubble all at once. 
If you are heating distilled water, place a toothpick into the container before you start adding heat. If you forget to add the toothpick do not add it after you begun heating: it will cause the water to explode!


The glowing water is almost as dim as my sphintheroscope (see my other posts). For that you need to wait 30 minutes in total darkness. Sonoluminescence with room temperature water with my setup takes about 10 minutes of sitting in darkness for the eyes to adapt.

What does it look like? Glowing swirls every time I breathe into the bubbler tube. As I tune the signal generator and get an extra high squeal and then breathe the swirls condense into a single glowing point! So, I was able to create and experience multi-bubble sonoluminescence (MBSL) and single-bubble sonoluminescence (SBSL).

Like a swarm of fireflies whisked up by a strong summer breeze...only to leave a single one hovering inches before my eyes.


I saw a firefly before my eyes once...it was delicious. Meow.

Saturday, April 1, 2017

Nuclear Cloud Chamber With No Dry Ice


Nuclear Cloud Chamber With No Dry Ice


An hour of putting stuff together and glopping thermal paste yielded a nuclear cloud chamber that doesn't need dry ice!


The wine goblet is filled with 99% isopropyl (rubbing) alcohol which gets supercooled and turns into a fog in the the glass goblet. Then you can see alpha, beta, gamma and muon tracks zipping through the fog: visible radiation! I have various radioactive sample sources, plus if you put no radioactive stuff in the chamber every 3 or 3 minutes you'll see a particle zing through and that'll be the result of a cosmic ray interaction: a muon!

My other nuclear cloud chamber is MUCH simpler: an upside down aquarium resting on a metal plate that sits on top of a block of dry ice. I want to eventually bring this into work (I'm a librarian) and while the radioactive stuff is safe (unless you swallow it) the dry ice is just annoying to deal with after the awesomeness of it gets old: it's cold, melts (well, sublimates), will explode any container it gets sealed it, burns, little kids want to touch it...all not so great for a science demonstration. Plus the only place that sells it is the Walmart that's like 15 minute drive. With this design I just plug it into a wall outlet and dump in a little rubbing alcohol: bam! Coldness.


Contrary to what the internet says, my Peltier Coolers have their hot side on the printed logo side. I hooked a 9v battery up to them for less than 2seconds to be able to feel and mark the cold side.


Arctic 5 thermal paste works at very low temperatures. I didn't even finish the first teeny, tiny tube.


A lump of AM-241 getting a pure alcohol shower.


Starting top to bottom:

Glass wine goblet

Rubber gasket

Piece of thin plexiglass

Arctic 5 thermal paste

Peltier 12709 thermal electric cooler

Arctic 5 thermal paste

Peltier 12710 thermal electric cooler

Arctic 5 thermal paste

Cooler Master 212x dual fan (upside down)


Atx computer supply which provides: 12vdc, 5vdc and a shared ground.


Both fans and the bottom Peltier 12710 go to the 12vdc and the ground.

The top Peltier 12709 goes to the 5vdc and the same ground.

I used the ATX power supply I converted to a bench power supply a few posts ago because it has the two voltages I needed along with (most importantly) lots of amps! Wall wart power plugs can easily be found to give 5v and 12v but not at the large amount of amps. Wall warts usually max out at 1 or 2 amps but the Peltier Coolers take up to 10 amps! The ATX can provide 12vdc at a monstrous 28 amps.

How does it do? Here some video:


Note the curly particle tracks! In my dry ice nuclear cloud chamber I get lots of boring, straight and short alpha tracks-not these awesome whirly curlies.

Here's a video of the whole setup:


I thought it wasn't working until I moved the flashlight way far away. This probably collimated (narrowed and focused) the light beam. My dry ice chamber is foggy, but this electrically cooled chamber rains down the alcohol!

I'm happy it works. I'm happy it shows different types of tracks than my other chamber. Just add a piece of radioactive material, 99% rubbing alcohol and plug it in.


The Cooler Master 212X Fan and Heat Sink Unit

It came with 2 fans. One fan was already attached. The other fan I needed to: attach two plastic brackets with 4 screws and then just plunk it on the other side. You get TWO little rubber pads that you must cut and make into FOUR rubber pads. You then stick these on the 4 screws OR ELSE THE FAN YOU INSTALLED WILL SLIDE RIGHT OFF THE FINS AND FALL ON THE FLOOR! For most applications that doesn't matter at all and if your fan might hit your RAM or something else leave them off and you can easily slide the fan up a little for extra clearance. However, since I'm making a mobile nuclear cloud chamber I put the four pads on--just the like the first pre-installed fan.

On the edges of the square fan bodies you will find arrows: one shows the direction of spin, the other shows the exhaust side of the fan. One fan should have it's arrow pointing toward the fins (intake/push) and the other facing away from the unit (exhaust/pull).

They included a TON of brackets, a cool sort of socket thingy to turn your phillip's head screwdriver into a hexonal computer board stand off wrench-thingy, rubber sticky pads and thermal paste. The thermal paste is fine, but since I'm trying to freeze isopropanol (and started at room temperature and not a hot computer) I needed a paste that could work closer to -50 C, so I just squirted some Arctic 5 thermal paste (and NOT the thermal EPOXY which will never come off). Let me repeat that: SOME Arctic 5 is paste and some is on-forever-epoxy.Get the paste.

How do you apply the thermal paste? If your application is round use the pea-shaped blob in the center and smoosh. If it's a square/rectangle use a spreader. On test after test on YouTube it really didn't matter. In my application my cold plate is plexiglas and I can SEE the thermal paste from the top-side of the chamber and had to use the spreader method (old credit card) to get it looking nice. Smoosh method and "hope" it's everywhere (it won't be) or spreader and "know" it's everywhere. LOL!

This is underneath two Peltier cooler tiles > plexiglas cold plate >rubber gasket and a big old wine goblet. Most of the aforementioned pieces are coupled with thermal paste. Power comes from an ATX computer power supply I made into a bench top power unit a while ago.

So, how is this unit itself? HUGE, tall, incredibly well finished on the cooling block. I just spun both fans up with a 9 volt battery and they: spun so fast I couldn't see them and were dead silent!


The Two Peltier Coolers

I'm using two different Peltier Coolers (12709 & 12710) stacked to make the cooling portion of a Nuclear Cloud Chamber. This replaces the dry ice. The more powerful 12710 goes on the bottom, touching the Cooler Master 212X.

As a test I briefly hooked each to a 9volt battery. In less than a second, with the red wire going to the positive post on the battery the coolers became almost painfully cold one one side and warm on the other. The Cold side was the one with the model number printed on it.

Do not run these for more than a second without them being mounted to a heatsink with fans using thermal paste or else you'll ruin them.

Arctic 5 thermal paste is a popular choice. These can get down to -50C° and some thermal pastes only go down to -20C°. I'm starting with room temperature 99% isopropyl alcohol so I might actually get close to that bottom temp... The online spec sheets specify the Tmax Delta (how many degrees it'll cool from your starting temperature).


The Rubber Mat (LASCO 02-1048E Rubber Sheet, 6X6-Inch and 1/16-Inch Thick)

This is creating a seal between the cold plate (which is sitting on top of two Peltier cooler tiles) and a big old wine goblet. This rubber was REAL rubber. Good feel and that new car tire smell. I was able to easily cut it with a pair of scissors.

The sheet was really "floppy" and could conform to curves if needed. You could easily roll this up and line the inside of a coffee mug or something. Not sure why you'd want to do that, but it'd take zero effort: nice and bendy.

The only bad thing was that at the center of one edge was a retail hanger tag, the kind with the hole in it to hang off of metal rods in a store. It was STAPLED to the rubber sheet. Just a regular old small staple, and for my purposes it made no difference. Even if I were pulling a strong vacuum (which I'm not) the two staple holes would probably seal themselves up, plus they're at the extreme edge so it wouldn't matter anyway.

Well, that's about all the comments I can muster on a boring old piece of rubber, lol.


The Wrap Up

I get most of my supplies from Amazon. Some stuff I find in eBay and the Disabled American Vets' (DAV) resale shop up the street (just like a Salvation Army store). Many things I find in the trash. Except for my fusor build, which got me into the Plasma Club on fusor.net, I rarely buy things from actual industrial/scientific suppliers. 

So, this project had some cool benefits: no dry ice, I got to see particles I never saw in my other cloud chamber, I got to use my ATX power supply for something finally. It was fun. It can travel/be set up without any dry ice.

On the downside: It's a much smaller chamber and harder to see what's going on. My fish-tank and dry ice nuclear cloud chamber can be viewed by an entire classroom. This chamber is probably only for a single person (holding a flashlight in a dark room) at a time. It's sort of fiddly: you have to hold the flashlight away at arms length and sort of tilt your head and squint and work to see it.


I tilted my head...but I can't hold the flashlight good. Meow!

Wave propagation


WAVES


This is the simplest answer I can muster to the question: "Why does light but not sound travel through space?"

Bullets can travel through the air. A bullet can travel through water. A bullet can travel through the vacuum of outer space. A bullet is a mechanical object (an actual thing) that you can shoot anywhere.


Waves of sound can only travel through air or solid matter (a non-vacuum). Just like waves of water can only travel through water. Sound is a mechanical wave. It moves through the air like waves move through water. Take away the air or water and you get no more waves in them.  Sound actually travels more than four times faster through water than air, because the water molecules that get banged into (vibrate) to propagate the waves are packed more closely together. For this reason sound travels faster in hot (vibrating) air more quickly than in cold air with its more slowly vibrating molecules. Simple.


Light is made of photons that can travel through a vacuum, air, water because photons are like little bullets of light that travel in waves…so they are particles and waves together. Not so simple.

Electrons can travel through the air and the vacuum of outer space. Electrons travel in waves called electromagnetic waves…so they are particles and waves together…Light is considered and electromagnetic wave, as are radio waves, ultraviolet, infrared, microwaves, x-rays, gamma-rays, etc. 

Since when acting as a mechanical object (a light photon smacking into atmosphere) an electromagnetic wave starts vibrating atoms (just like waves in water) these electromagnetic waves travel slower when they're not in a vacuum! In a vacuum they travel at the speed of light...because it is light. Light travels at the speed of light...in a vacuum...duh!

Light moves through a vacuum at 186,282 miles per second; through Earth's atmosphere it moves at 186,227 miles per second.


You'd think that since soundwaves travel faster in water, that electromagnetic waves would travel faster in air (than in a vacuum). You'd be wrong, as we've just read. 

Mechanical waves (water, sound, bullets) are like clunking people's head's together. If the Three Stooges are standing close to each other and you slap Curly all three heads clunk together quickly, the farther apart the Stooges are standing the slower each clunk is. Water is closer together than air.

Electromagnetic waves behave more like waves when they hit solid things, the waves distort and slow down. Yep, it's weird.

Anyway, most stuff moves in waves. Most particles show a dual wave/particle nature: electrons, photons and even some (by comparison) HUGE molecules will flow through a Young's Double Slit Experiment will show light going through two slits in a metal plate: it will come out as a wave on the other side...but if it's a photon particle how is it a wave? Even a single electron fired through one of the slits will go through and impact a screen behind the plate...if you fire electrons (or just about anything else) through the slit one after the other they make a wave-shaped pattern on the screen! Single particles move with the probability of a wave.


Single food particles ended up on MY side of the screen. Yum!

Saturday, November 12, 2016

Gamma Spectroscopy Lab Part 1: Background Notes & Theory


Gamma Spectroscopy Lab Part 1: Background Notes & Theory


The following is an ongoing build diary for my gamma spectrometer lab, which is why some things are in past/future tense since portions were typed before/during/after setting up various equipment. 

Here is the end result I wanted: a radioactive sample in a lead shield pig > measured by a Nai(TL) scintillation crystal detector > powered by the GS-1100A pmt driver > the signal is fed backwards through the GS-1100A to the computer running PRA or Theremino > which displays gamma energy lines on the screen.


The GS-1100A is powered by the desktop computer's USB port. The GS-1100A is what provides the high voltage to run the NaI(TL) detector. The GS-1100A is also what converts the NAi(TL) scintillator's output to sound, which is then fed back to the computer's mic/line input.

Scintillation Detectors (Not Geiger Counters)

Geiger counters give a click. Sometimes a lot of clicks, sometimes just a few. And that's all they do.

Gamma Spectroscopy takes a click and analyzes that click, developing it into a waveform shape that can be analyzed so minutely that you can tell what element/radioisotope you're measuring. It does this by calculating the spectrum of the radioactive source.

Geiger Counter = "Lots of clicking!"  vs  Gamma Spectrometer = "You've got plutonium!"


Here's the basics of gamma spectrometry, stated in various ways but saying the same thing :


A gamma wave hits the scintillator crystal which glows a little. The Photo Multiplier Tube amplifies this glow and change it to voltages which are read by the Multi Channel Analyzer and output to a computer screen in the form of an x/y waveform graph.


Gamma Ray > Scintillator > Photo Multiplier Tube > Multi Channel Analyzer > Display.
       

 Gamma Ray > Scintillator > PMT > MCA > Display.


Gamma Ray > photon > photo-electrons > electrons > voltage > display.


Gamma rays are waves of photon energy. A photon is a packet of light energy. A Gamma ray is a certain frequency of light energy/photon. Different wavelengths of energy are: visible light, UV light, x-rays, gamma rays, FM and AM radio, etc.

Gamma rays/photons have ZERO mass. They have no electrical charge (neutral). As such they move ONLY at the speed of light and never slow down. They can be scattered (bounced in a different direction losing none or some of its energy) or absorbed (it is destroyed and ALL its energy is transferred to whatever it hits and either knocks off an electron which is then called a photo-electron, or it splits into an electron + positron itself).

Thus, like the rest of the spectrums of light the question remains, "is it a wave or a particle?" At different times it behaves like both!


In our setup a gamma ray hits the scintillator crystal. The Scintillator crystal gives off light (photons). The photons enter the Photo Multiplier Tube. Inside the Photo Multiplier Tube there is a dynode. Each photon (sometimes they call this a "photo-electron") hits a metal plate (dynode) and turns into something like 10 impact electrons. There are many of these dynode plates, each one giving off more and more impact electrons as the energy travels through the PMT. At the other end of the PMT comes the electrons that are now around 1,000,000 times more numerous. NaI(Tl) gives off 42,000 photons per MeV; so 42 photons per KeV. The multi channel analyzer then sorts these voltages and sends the info to a display. The display can be a computer screen showing a wavelength in x/y axis. Each radioactive substance has a unique wavelength/shape and can thus be identified.

This is very cool so, of course I needed to set up a gamma spectroscopy lab in my house. First I'd need a radiation probe that has a scintillation crystal instead of a Geiger-Mueller (GM) Tube. GM tubes just give a click, no other usable information. Different crystals are better suited to reading different power ranges of gamma energy. 


I snagged this chart of Gamma Energies from Cal State Polytech Professor Peter Siegel's Biology 431 Study Guide from the Physics Department at Cal Poly Pomona. This lists the gamma energy of various radioactive substances. Of note for me are AM-241, LU-176, the various U- uranium isotopes and the old stand by: Radium.

Note that it gives the energy, but not the wavelength since gamma waves are around 0.1nm anyway. We're talking about Kilo electron Volts (KeV) here. This is not like my other spectrometers that give nice, simple colored lines that are held up to a nano meter scale ("green means the element mercury"). What will have is, say radioactive potassium (K-40) that upon decaying it gives off a neutrino and a 1460 KeV gamma ray. That 1460 will show up on our graph and we'll know we have Potassium K-40.

Gamma Energy
(KeV)
Nuclide
Half-Life
Percent Yield
per decay
8
Er-169
9.4 days
0.3
22
Sm-151
87 years
4
24
Sn-199m
250 days
16
30
Ba-140
12.8 days
11
31
Mg-28
21 hours
96
35
I-125
60 days
7
35
Te-125m
58 days
7
37
Br-80m
4.38 hours
36
40
Rh-103m
57 minutes
0.4
40
I-129
1.7×10⁷ years
9
47
Pb-210
21 years
4
51
Rh-104m
4.41 minutes
47
53
Te-132
78 hours
17
58
Gd-159
18.0 hours
3
58
Dy-159
144 days
4
59
Te-127m
109 days
0.19
60
Am-241
458 years
36
63
Yb-169
32 days
45
63
Th-234
24.1 days
3.5
68
Ta-182
115 days
42
68
Ti-44
48 hours
90
70
Sm-153
47 hours
5.4
77
Pt-197
18 hours
20
77
Hg-197
65 hours
18
78
Ti-44
48 hours
98
80
Ba-133
10.51 years
36
81
Ho-166
26.9 hours
5.4
81
Xe-133
5.27 days
37
84
Tm-170
130 days
3.3
84
Th-228
1.90 years
1.6
87
Eu-155
1.81 years
32
88
Pd-109 / Ag-109m
13.47 hours / 40 seconds
5
Gamma Energy
(KeV)
Nuclide
Half-Life
Percent Yield
per decay
88
Cd-109 / Ag-109m
453 days / 40 seconds
5
88
Lu-176m
3.7 hours
10
91
Nd-147
11.1 days
28
93
Th-234
24.1 days
4
95
Dy-165
139.2 minutes
4
99
Gd-153
242 days
55
99
Au-195
183 days
10
100
Pa-234
6.75 hours
50
103
Sm-153
47 hours
28
104
Sm-155
23 minutes
73
105
Eu-155
1.81 years
20
113
Lu-177
6.7 days
2.8
122
Co-57
270 days
87
122
Eu-152
12 years
37
123
Eu-154
16 years
38
124
Ba-131
12 days
28
128
Cs-134m
2.9 hours
14
129
Os-191
15 days
25
133
Hf-181
42.5 days
48
134
Ce-144
284 days
11
136
Hg-197m
24 hours
42
137
Re-186
90 hours
9
140
Tc-99m
6 hours
90
143
U-235
7.1 x 10⁸ years
11
145
Ce-141
33 days
48
147
Ta-182m
16.5 minutes
40
150
Te-131
25 minutes
68
150
Cd-111m
48.6 minutes
30
150
Kr-85m
4.4 hours
74
Gamma Energy
(KeV)
Nuclide
Half-Life
Percent Yield
per decay
155
Re-188
16.7 hours
10
158
Au-199
75.6 hours
37
163
Ba-140
12.8 days
6
164
Xe-131m
11.8 days
2
166
Ba-139
82.9 minutes
23
172
Ta-182m
16.5 minutes
40
185
U-235
7.1 x 10⁸ years
54
186
Ra-226
1602 years
4
191
Mo-101
14.6 minutes
25
191
Pt-197
18 hours
6
192
In-114m
50.0 days
17
198
Yb-169
32 days
35
208
Lu-177
6.7 days
6.1
210
Ge-77
11.3 hours
61
215
Hf-180m
5.5 hours
82
215
Ru-97
2.9 days
91
230
Te-132
78 hours
90
233
Xe-133m
2.26 days
14
239
Pb-212
10.64 hours
47
239
As-77
38.7 hours
2.5
246
Sm-155
23 minutes
4
247
Cd-111m
48.6 minutes
94
250
Xe-135
9.2 hours
91
255
Sn-133
115 days
1.8
263
Ge-77
11.3 hours
45
265
Ge-75
82 minutes
11
265
Se-75
120.4 days
60
279
Hg-203
46.9 days
77
284
I-131
8.05 days
5.4
286
Pm-149
53.1 hours
2
293
Ce-143
33 hours
46
295
Pb-214
26.8 minutes
19
Gamma Energy
(KeV)
Nuclide
Half-Life
Percent Yield
per decay
299
Tb-160
72.1 days
30
305
Kr-85m
4.4 hours
13
307
Tc-101
14.0 minutes
91
308
Er-171
7.52 hours
63
310
Pa-233
27.0 days
44
317
Ir-192
74.2 days
81
319
Nd-147
11.1 days
3
320
Cr-51
27.8 days
9
325
Sn-125m
9.7 minutes
97
328
Ir-194
17.4 hours
10
333
Hf-180m
5.5 hours
93
335
Cd-115 / In-115m
53.5 hours / 4.5 hours
50
342
Ag-111
7.5 days
6
344
Eu-152
12 years
27
351
Bi-211
2.15 minutes
14
352
Pb-214
26.8 minutes
36
356
Ba-133
10.51 years
69
360
Se-83
25 minutes
69
362
Pd-103
17 days
0.06
363
Gd-159
18.0 hours
9
364
I-131
8.05 days
82
368
Ni-65
2.56 hours
4.5
388
Sr-87m
2.83 hours
80
393
Sn-113
115 days
64
393
In-133m
100 minutes
64
403
Kr-87
76 minutes
84
405
Pb-211
36.1 minutes
3.4
412
Au-198
2.698 days
95
427
Sb-125
2.7 years
31
439
Zn-69m
13.8 hours
95
Gamma Energy
(KeV)
Nuclide
Half-Life
Percent Yield
per decay
441
I-128
25.0 minutes
14
444
Hf-180m
5.5 hours
80
468
Ir-192
74.2 days
49
477
Be-7
53 days
10.3
479
W-187
23.9 hours
23
482
Hf-181
42.5 hours
81
487
La-140
40.22 hours
40
490
Cd-115
53.5 hours
10
496
Ba-131
12 days
48
497
Ru-103
39.6 days
88
511
Cu-64
12.8 hours
38
511
Ga-68
68.3 minutes
176
511
As-74
17.9 days
59
511.0034
Na-22
2.60 years
180
512
Ru-106 / Rh-106
367 days / 30 seconds
21
514
Sr-85
64 days
100
514
Kr-85
10.76 years
0.41
520
Se083
25 minutes
59
527
Xe-135m
15.6 minutes
80
530
I-133
21 hours
90
530
Cd-115
53.5 hours
26
533
Nd-147
11.1 days
13
537
Ba-140
12.8 days
34
538
I-130
12.4 hours
99
554
Br-82
35.34 hours
66
559
As-76
26.5 hours
43
564
Sb-122
67 hours
66
570
Bi-207
30 years
98
583
Tl-208
3.10 minutes
86
Gamma Energy
(KeV)
Nuclide
Half-Life
Percent Yield
per decay
596
As-74
17.9 days
61
599
Sb-125
2.7 years
24
603
Sb-125
60 days
97
605
Cs-134
2.05 years
98
609
Bi-214
19.7 minutes
47
619
Br-82
35.34 hours
41
622
Ru-106 / Rh-106
367 days / 30 seconds
11
637
I-131
8.05 days
6.8
658
Ag-110m
253 days
96
658
Ag-110
24.4 seconds
4.5
661.64
Cs-137 / Ba-137m
30 years / 2.55 minutes
85
669
I-130
12.4 hours
100
670
I-132
2.3 hours
144
686
W-187
23.9 hours
27
695
Pr-144
17.3 minutes
1.5
697
Te-129m
34 days
6
724
Zr-95
65 days
49
726
Ru-105
4.44 hours
48
727
Bi-212
60.6 minutes
7
740
Mo-99
67 hours
12
743
I-130
12.4 hours
87
747
Zr-97 / Nb-97m
17.0 hours / 60 seconds
92
748
Sr-91
9.67 hours
27
756
Zr-95
65 days
49
765
Nb-95
35 days
100
773
I-132
2.3 hours
89
Gamma Energy
(KeV)
Nuclide
Half-Life
Percent Yield
per decay
777
Br-82
35.34 hours
83
780
Te-131m
30 hours
60
796
Cs-134
2.05 years
99
810
Co-58
71.3 days
99
832
Pb-211
36.1 minutes
3.4
835
Ga-72
14.10 hours
96
834.827
Mn-54
303 days
100
837
Mn-56
2.58 hours
99
850
Te-131m
30 hours
31
879
Tb-160
72.1 days
31
885
Ag-110m
253 days
71
889
Sc-46
83.9 days
100
898
Rb-88
17.8 minutes
13
900
Pa-234
6.75 hours
70
935
Cd-115m
43 days
1.9
966
Tb-160
72.1 days
31
1020
Mo-101
14.6 minutes
25
1025
Sr-91
9.67 hours
30
1063
Bi-207
30 years
77
1078
Ba-68
68.3 minutes
3.5
1095
Fe-59
45 days
56
1115
Zn-65
245 days
49
1115
Ni-65
2.56 hours
16
1120
Sc-46
83.9 days
100
1120
Bi-214
19.7 minutes
17
1122
Ta-182
115 days
34
1140
I-135
6.7 hours
37
1173.2
Co-60
5.26 years
100
1210
Y-91
58.8 days
0.3
1274.5
Na-22
2.60 years
100
Gamma Energy
(KeV)
Nuclide
Half-Life
Percent Yield
per decay
1278
Eu-154
16 years
37
1280
I-135
6.7 hours
34
1292
Fe-59
45 days
44
1293
In-116m
54.0 minutes
80
1293
Ar-41
1.83 hours
99
1308
Ca-47
4.53 days
74
1332.5
Co-60
5.26 years
100
1350
Mg-28
21 hours
70
1369
Na-24
15.0 hours
100
1380
Ho-166
26.9 minutes
0.9
1408
Eu-152
12 years
22
1426
Cs-138
32.2 minutes
73
1434
V-52
3.76 minutes
100
1460
K-40
1.29 x 10⁹ years
11
1481
Ni-65
2.56 hours
25
1524
K-42
12.4 hours
18
1570
Pr-142
19.2 hours
3.7
1596
La-140
40.22 hours
96
1600
Cl-38
37.3 minutes
38
1692
Sb-124
60 days
50
1764
Bi-214
19.7 minutes
17
1780
Al-28
2.31 minutes
100
1811
Mn-56
2.58 hours
29
2614
Tl-208
3.10 minutes
100
2754
Na-24
15.0 hours
100
6130
N-16
7.2 seconds
69
7110
N-16
7.2 seconds
5


By the way, another great place to creep around and find info like this is the Oak Ridge National Lab at http://web.ornl.gov/info/reports/ which has tons of DECLASSIFIED reports of various techniques for radioactive fun. The earlier reports (1940s) are much more useful--later reports deal with specific institutional issues at the lab.


The Oak Ridge directories are by year--so just poke around. A cool file I found was "The Preparation, Properties, and Uses of Americium - 241, Alpha-, Gamma-, and Neutron Sources" in the 1962 folder. It was in one these reports that I found the idea of using talc all over the inside of a detector to increase internal reflectance...but was abandoned in favor of wrapping the sides of the crystal with aluminum foil instead, 'cause you know: who the heck wants a bunch of talc all over the insides of their particle physics equipment right? Especially since they were blowing air into the detectors to keep a positive atmospheric pressure in them so they could use them under water...'cause then the talc would just blow out into the water right? And that would be a really odd mess right? Then again I almost blasted a metal rod through my eyeball during a mishap with some acetylene so who am I to judge.

Anyway, you can actually order radioisotopes and have them delivered straight from the source in Oak Ridge, Tennessee. From the "Home of the Atomic Bomb" came my Cesium-137 sample.


"What's in the box?" Ok Brad Pitt, I'll tell ya: Cesium-137 from the Oak Ridge Tennessee National Nuclear Lab. Yes, the place where the atomic bomb was made.


I already have a probe (a Ludlum 44-7) that can read at the 60 KeV to 100 KeV range, but it's a Geiger-Mueller (GM) tube and not a scintillation crystal. Also, that's spread out over the alpha, beta and gamma ranges. I do have a probe with a scintillation crystal though, but it's a Ludlum 42-2 set up for neutron detection. Also, apparently my own blog here is one of the few resources in the that probe's specifications. I have no idea how it would react to gamma wave-other than screaming wildly like it does around Uranium. Although, I turned it down (up?) to 600v and it's actually a really nice gamma detector at that range.

Another option are lutetium-yttrium orthosilicate (LYSO) scintillators. What's neat about them is that they are in themselves radioactive! This is called in the literature "internal scintillator radioactivity". The lutetium (LU-176) has a half life of over 3 billion years. As a check source for calibration it's a fantastically stable thing to have. The small LYSO crystals go for around $10 online, although a bigger crystal for use as an actual scintillation detector can go for $200. LYSO crystals are very robust and can take being handled by human hands in humid air. They are also very dense and good at stopping particles. I already have one as a sample radioactive source. My geiger probes won't pick up it's weak radiation-so it's no go for Geiger detectors; only for gamma spectrometry.

Another crystal scintillation type is NaI(TL); which is Sodium Iodide crystals doped with a little bit of deadly Thallium. This type of crystal, although fragile, has the highest light output. It is the crystal by which other scintillators are judged by in that respect. Remember, we're going for flashes of light as particles hit the crystal, and then measuring the frequency of that light. 

Scintillation crystals react differently to different wavelengths of light and their power. Luckily, once a scintillator is mated to a Multi Channel Analyzer (MCA) the hardware and software do all the work and a lovely x/y line pops up telling you what you have.


Above is the scintillator I ended up with at first and while it's fantastic for survey meter work I replaced it for gamma Spectrometry while dialing in my new system.

Here's info about it anywayIt's made by an American company confusingly named "Alpha Spectra Inc", but its for gamma. Identical units are also found labeled as Bicron Inc. The unit as a whole is an Alpha Spectra Inc. 5I5 X 12/1.12 5B Scintillation Detector. There is an "I" not a "1" in the name on the label and the meager online info, but you could also try 515x12/1.12 as well. It's 9.5" Long and 1.4" square and has a 3" long x 1" square St. Gobain NaI(TL) crystal. 

It has an Adit-brand B29B01W Photo Multiplier Tube (PMT) with an 11 stage dynode. The "1.12" in the name apparently refers to the 1 1/8" diameter of the PMT. I've read where the 5I5 x 12 part of the name refers to 0.25" or 1.25" square crystal or something, but I don't see how that relates to the case or the crystal. I guess 0.515mm = 0.2" and 0.2" x 12 = 0.24". I dunno...but it was made in Texas. It's actually a version of their B29B02H that's just shorter, which is weird because the unit as a whole is super heavy and quite large already! It also features a delicious soda-lime glass window for the photons to enter.


It should be noted that D11 goes to Pin 12 (not pin 11). Anode = pin 13 and Cathode = pin 14. The 4700 cap is orange and huge and obvious, and ties D11 to ground. I believe the 5M resistor at the bottom is actually the potentiometer knob which can vary the total resistance of this unit from 11.4M to 16.4M Ohms. People who've actually managed to use this detector successfully for gamma spectrometry work actually turn it down to 11M ohms. 

The GS-1100A PMT driver has it's lowest voltage at 600v. See below for those calculations.


The Alpha Spectra Inc. detector has a sodium iodide crystal doped with Thallium NaI(TL) that shoots off photons when hit with gamma rays (which are also photons). Then a voltage multiplier dynode scales up the photons by x 1 million and turns them into electrons, then voltage which gives the readout. 

The spec sheet on the PMT seems to imply that it's happiest at 700v, but at onl 500 volts  it can "see through" my galvanized steel containment vessel to find the pitchblende (uranium) inside. Which is why preparations for the casting of a 223lbs lead "pig" vessel are under way. 

INFORMATION FOR GAMMA SPECTROMETRY

For gamma ray spectroscopy NaI(TL) crystal scintillation detectors are best. Bicron, Rexon, Teledyne and a few other detector brands can share internal components with each other. Here are general crystal stats:


Type
Scintillation Crystal Type
Density (g/cm)
Emission Maximum (nm)
Decay Constant
Index of refraction
Relative conversion efficiency
BaF2
Barium Fluoride
4.88
310 
0.63 
us 
1.50 
BGO
Bismuth Germanate
7.13
480
0.3
us
2.15
15-20
CaF2 (Eu)
Calcium Fluoride
3.18
435
0.94
us
1.47
50
CdWO4
Cadmium Tungstate
7.90
470/540
20/5
us
2.30
25-30
CsI(Na)
Cesium Iodide doped with Sodium
4.51
420
0.63
us
1.84
85
CsI(Tl)
Cesium Iodide doped with Thallium
4.51
550
1.0
us
1.79
45
CsF
Cesium Fluoride
4.64
390
3.5
ns
1.48
5-7
GSO(Ce)
Gadolinium Silicate doped with Cerium
6.71
440
30-60
ns
1.85
20-25
LiI (Eu)
Lithium Iodide
4.08
470
1.4
us
1.96
35
NaI (T1)
*Sodium Iodide doped with Thallium*
3.67
415
0.23
us
1.85
*100*
YAP
Yttrium Aluminum Oxide Perovskite
350
27
ns
ZnS(Ag)
Silver activated Zinc Sulfide
4.09
450
110
ns
2.36
25 - 30


Rexon Inc.'s Dr M. H. Farukhi has layed out an informative explanation of each crystal type here: http://www.rexon.com/crystalscintypes.htm

Many different detectors are made by the same few companies. A $600 Bicron unit can be identical to a $40 used Rexon!


Also I discovered that my Rexon 3.0 PX 2.0/3.0 is also known as an Alpha Spectra 128i/3 and as a Bechtel 223-128. It has a super fancy voltage divider with three tiers of round circuit boards-which unplugged and replaced with the one from Iradinc.


The bottom layer is high voltage. The other two are controls for computer interface.


Luckily, it just unplugged easily and I popped on my new 62M Ohm voltage divider and then it worked with the Ludlum Model 3 survey meter and the GS-1100A.


GS-1100A PMT DRIVER

The PMT (photo multiplier tube) driver from Australia can apply voltages from 600v-1100v so I may have to short the first zener diode to ground (inside the GS-1100A driver from Australia, not my PMT). That will drop the voltage down -200v from the minimum 600v; so I'll be at 400v. We'll see. The PMT driver also plays best with detectors that have a resistance of 15M Ohm. 

The Alpha Spectra Inc. has a variable resistance pot right on top that can vary the resistance from 11.4M-16.4M (according to spec sheet) so I should be fine but again, we'll see. I had to turn this pot all the way down and then turn the voltage on my Ludlum 3 survey meter down 495 v to get the background reading to just a few counts and make it usable as a simple gamma probe. Of course this may not matter in gamma spectrometry and maybe being in my custom cast lead enclosure should help a bit. Maybe I can also simply swap-out the potentiometer with one of a different resistance?

Looking at the face value of the resistors it's actually 11.181M + the 5M potentiometer. So, 16.181M working with at most 500v.

The GS-1100A has a known voltage dip which may help me out too. It has a 1M resistor built into it, which is used in the following calculations as "+ 1M".


Voltage Setting on the knob = (desired voltage/Actual Resistance) x (Actual Resistance + 1M)

400v / 16.181 x (16.181+1) = 424v on the knob

The lowest knob setting is 600 volts (which is actually 400 volts if I opened the unit up and grounded the 1st Zener Diode). That lowest setting of 400 volts would be less than 400 volts as you can see from the maths above with my particular detector plugged in the actual power reaching the PMT is only 94.11%. 

So at the lowest setting of 600 volts > ground shorted to 400 volts =  376.44 Volts actual!

Not bad. I can always turn the voltage up, and this is before the lead shielding and shutting off the fluorescent lights dangling 2 feet above my testing table to get the background noise as low as possible.

Of course my neutron probe with a ZnS(Ag) crystal might work too --and it can take 600v no problem. So I've got plenty of options to try if just plugging in the Alpha Spectra Inc. detector at 600v is too noisy.

A "noisy" background with a lot of clicks on a survey meter might mean nothing on a spectrometry setup; and even though there were lots of clicks, I could still use the 10x, 100x meter settings and the needle was at the 1/4 to 1/2 point (with no radioactive sample) and rose noticeably when a radioactive sample was brought close to it: so plenty of headroom! Luckily the Ludlum 3 survey meter has an audio off switch, so the constant background clicks couldn't bother me.

Also, I noticed that the meter started rising when the sample was more than 2' away! None of my other detectors do that, so we've also got plenty of sensitivity! The fact that I was holding it in my hand was none too pleasant a thought.

I shouldn't be surprised, in a November 1950 Status and Progress Report from the Oak Ridge National Lab:


With a thallium activated NaI crystal, the lower energy detection limit is of the order of 10-15 Kv. The instrument has been used successfully in finding 25 gms. of U 235 deliberately hidden in a location where the background is of the order of 5000 counts per minute. The 25 gram source was easily detectable from one foot away even through 1/2 inch of steel; without shielding it read 30% over background at 10 feet.
I guess I need to move to a spot farther away from my isotope collection!

Scintillator detectors (as opposed to Geiger-Mueller tubes) are also notoriously sensitive to electromagnetic field (EMF) interference from lights and other devices. The lead (and possibly a sheet of copper or mu-metal) will help with that too! 

My next tests were: using a proper 10M ohm input sensitivity voltmeter instead of an 11M one; putting the Alpha Spectra Inc. scintillator in a light-proof bag to test for light leaks; turn off the lights to test for interference from the fluorescent lighting in my lab. 

Test results: no light leak; no significant EMF interference. multimeter with 10M Ohm input resistance reads about 500v (instead of 250v). 

The Alpha Spectra Inc. detector seems to operate just fine with the GS-1100A unit using PRA and/or Theremino MCA. I've have it at 600v-1000v and am still trying to find the sweet spot. At the lower voltages I have to raise the input gain in PRA to 3 or 4. I can have gain set to 1 with the voltages higher. It'll take weeks of experimenting to determine which settings have the best singal to noise ratio; however they all seem to work fine.


Do you want to learn more about photo multiplier tubes? Noted manufacturer Hamamatsu has this free book available as a 323 page PDF file online: https://www.hamamatsu.com/resources/pdf/etd/PMT_handbook_v3aE.pdf 

Adit themselves are now part of ET Enterprises: http://www.et-enterprises.com/ and you can search this tube and get spec sheets and even accessory part numbers.


Next steps will be making the lead shielding "pig" and setting up the hardware.


Gamma Spectrometry Lab 2: The Lead Shield 


THE LEAD PIG

The lead was delivered yesterday and actual fancy blueprints drawn up. Soon a piece of equipment (the GS-1100A) will arrive from Australia: instead of clicks I'll have a computer screen saying "Uranium detected". Background radiation is an issue because instead of just a few extra spikes we'll get too many spectrum lines--this isn't a real problem since both PRA and Theremino allow you to take a reading of the background and then delete it before you place your radioactive sample onto the detector.

So a lead shield was needed. The design started simple and lead is cheap. 

I requested a large lead shield since I could then also use it for cosmic ray and muon detection where you want the least amount of background noise as possible.  

So, a mold was made to pour the lead into.


At the bottom is a flat lid of a large "bowl". 

On top of that is bolted a column of small 4" diameter Turkish coffee cans (the "pipe" in the diagram above). These will be empty and provide the open center of the lead pipe we're making. Of course, to have one end of the pipe sealed permanently we'll pour 2" of lead into this center column-the rest of the lead gets poured outside of this column.


The surrounding the central column is a metal sheet pounded into a perfectly straight cylinder that is 8" in diameter. 


The rest of the lead gets poured outside of the central column and inside of the outer column. This yields a lead pipe with: a 4" diameter center opening inside diameter; an 8" exterior diameter and 2" thick walls. With 2" of lead closing off one end of the pipe permanently.

Here is the start of the 8" outer cylinder mold being formed. It started as a rectangle sheet of steel. Each of the two ends were bent to form a simple interlocking joint (a flatlock seam) once the sheet was formed into a cylinder. The bends were made with a tool called a seamer but pliers could have been used.

A weight lifting weight was placed inside the cylinder and a hammer used to crimp each end of the cylinder to act as a sort of mandrel to pound against. The weight was used at both ends of the cylinder to true up and round the ends-then this weight was removed. This provided a few things: the rounded edges look really nice; the rounded (somewhat chamfered / bull nosed beveled) edge will provide a rounded edge to the lead instead of crumbly sharp edge; by pounding the edges of the cylinder over the opening at each end became a nearly perfect circle; this rounded edge is much stronger and keeps the cylinder from flexing; these edges are perpendicular to the cylinder walls which makes the cylinder stand perfectly upright on a table--which means it'll stand upright on the pot lid which will hold these molds while the molten lead is poured.

Here's the cylinder at the beginning of the process: it's locked together with the flatlock seam, but it's more of a teardrop shaped tube instead of a circular tube. The ends are locked together (loosely) at that seam. The seam is later pounded flat.


Patio blocks and steel bedframe rails.


Acetylene torch-propane is just too slow. 


Notice the sand at the bottom. After the center was filled with 2" of lead (for the end cap) sand was placed to seal the outer edge so the outside of the pipe could be poured.


The iridescent rainbow color is from tin contamination. Tin floats on top of the silvery molten lead and looks like bright blue plastic. 


After the first 2" the center column gets filled with sand to keep the lead out. Here you can see the area beyond the outer rim filled with white sand to keep the lead from spreading past the (black) outer casing of the pig.


Our Lead Casting Process:

1. Put lead wheel weights into crucible.

2. Heat from above and add more lead. 

3. Heat from below while someone else picks out the steel clips with a strainer ladle (big spoon with holes in it).

3. Take away the torch once all the solid junk has been removed.

4. Dip a large wax candle into the molten lead and quickly remove it: it will smoke and then burst into flames.

5. Strain any remaining slag the wax brought to the surface. 

6. Pour the lead into the mold. 


The wax candle flux helps break the surface tension formed by the intense heat oxidizing impurities in the lead (tin, zinc, etc.). Whatever doesn’t “reduce” back into molten metal gets quickly skimmed off the top with the ladle and then molten lead is poured into the mold. The result is a more homogeneous lead mixture and less lumps or crumbly bits in the finished product. 

Alternatively, burnt sawdust or straight-out carbon could be used. The carbon is better at reducing zinc and other various impurities than wax. Goodness knows I sure have enough carbon laying around: http://michaellogusz.blogspot.com/2015/08/great-balls-of-carbon-theyre-actually.html 


Supplies Needed:


  • At least two buckets of wheel weights, or enough lead by weight (not including wheel clips) to fill your mold.


  • Sand to keep lead from filling certain parts of the mold or leaking past the mold.


  • Long 3/4" thick wax candle.

  • Gloves (thick welder's gloves to hold the torch and for pouring crucible out.).


  • Face mask (a full woodworker type plastic mask will help keep the noxious fumes out of your eyes)


  • Blocks (concrete, cinder, bricks-it just has to be stable and fire-resistant).

  • Bed rails (or something fire-resistant to hold the crucible).

  • Ladle with holes (for picking out the steel clips and straining the slag).


  • Coffee can for slag (have it near the lead, fill it and empty it occasionally onto the trays).


  • Trays or place to dump coffee can of slag out repeatedly.


  • Acetylene torch (propane works for casting bullets but not for melting 200lbs of lead).


  • Vice grips to help hold crucible when pouring (pliers would slip, remove vice grips after each pour).


  • Tiny shovel, broom, dust pan, funnel (to place the sand and then clean up).


Set all this stuff up before starting!!!!! Do a "walk-through" of how to position the torch, how to transition from heating top to bottom without hitting the knobs on the torch, who will ladle the slag and how you'll not burn their hands while they do it. 


Casting the Pig! It was finished on Thanksgiving 2016 so it's the Lead Turkey!

Here are the 10-15lbs of clips and slag removed from the first 100lbs of wheel weights' worth of lead. This was once an over-full 5 gallon bucket of wheel weights.

If you buy lead ingots you just get lead. If you buy wheel weights you get 10-35lbs of clips and other junk that gets strained out with the ladle. Remember that when pricing out lead sources!


This is the halfway point. About 100-120lbs of lead have been melted and poured into the mold. Look at those two trays filled with steel clips and slag! That's why you need two people: one just operates the torch--the other strains the clips and slag and then carefully pours the molten lead into the mold.


Blueprints showing the half-way filled status:


The lead turkey on its very own torpedo sled! ( and I know a little something about torpedoes: http://mikelogusz.blogspot.com/ )


Too smokey and too loud!


Gamma Spectrometry 3: Software


PRA / THEREMINO SETTINGS

I keep bouncing between using the PRA software and the Theremino software. With either you have to go into your computer's control panel > sound > recording > mic or line input properties:

Under the LEVELS TAB > set volume to 100%
Under the ENHANCEMENTS TAB > CHECK to disable all sound effects
Under the ADVANCED TAB > note your bits (16) and Megahertz (44,000 or 48,000 or 96,000)

In either PRA or Theremino you'll tell it that you're using your soundcard, that it's set to 16 bits and 96,000Mhz or whatever. You'll also have to specify you're using the LEFT channel in and out! 

Here are some recommended basic settings for PRA but you'll still have to play with the single input wave audio display with the x/y grid which is super-critical and a total pain:


These settings will change depending on your: scintillator detector; voltage setting on the PMT driver; type of sound card; volume setting of sound card; radioactive source; background radiation; type of experiment you're performing; etc. The above is the recommended starting points. 

In some versions of the software, depending on your detector you may have negative pulses. You'll just type in "-0.3" instead of "0.3" in the top left Height Threshold windows. 

I played with different Height Threshold settings from 0.01 to 1 and everything still "worked" but the readings were different. So, basically as long as you have the input = Left and output = Left and Channel Selection = LEFT in the PRA or Theremino software and the volume set to 100% on your control panel > soundcard you'll almost always get some sort of reaction by moving radioactive material up to the detector.

After that, it's just calibration to fine tune your settings. For me, getting a response on screen was easy. I'm still playing around with the calibration. 


A word of warning: Am-241 has TONS of gamma radiation. Online, many many people write that it's "mostly" or "almost all" alpha radiation, but they are WRONG! While alpha radiation of Am-241 is it's primary decay, a piece of Am-241 out of a smoke detector puts out a LOT of dangerous gamma radiation. Many times people on the internet confuse the (true) statement that "AM-241 decays to NP-237 by 100% alpha emission"...which means just that, the rest of the Am-241 that doesn't turn into Np-237 turns into gamma rays--which is a really weird way of phrasing that, but when everyone else is just cutting and pasting the confusion grows. Thus you have alpha and gamma radiation.

I tend not to cut and paste words from other people-I write what I see and do, and with ALL of my half-dozen different radiation detectors I find a LOT of gamma coming off my numerous Am-241 sources. The internet is an echo chamber, and if someone gets something wrong--well, they're will be a ton of other people repeating that mistake.
When I place a sheet of cardboard between the AM-241 and a detector the count rate goes down, but not away completely. AM-241 can make my gamma detector (which cannot register alpha radiation at all) squeal. Experiment for yourself and see. 
Anyway, Am-241 will show up as Am-241, Np-237, Uranium, Protactinium, Thorium, Actinium, Radium, Thallium, a few radioactive versions of lead...it's kind of a mess on a spectroscope. You can get rid of the first four spikes by using a Thorium source like a welding electrode (incorrectly referred to as welding rod) instead of an Am-241 source.


So, to simplify calibration I purchased a CS-137 check source. 

Cs-137 beta decays into Ba-137m (metastable). The Ba-137m gamma decays (at 661.64Kev) into stable Ba-137. This gives us the right hand spike on screen. In the center may be a little spike at 551Kev because 

Hopefully, once everything is setup properly the screen will show a large spike at 661.64KeV (which is really from the Ba-137m decaying into stable Ba-137) and another Barium spike closer to 32KeV. This is much simpler to deal with at first: two spikes on your computer screen.

As an aside, you can drizzle NaCl onto Cs-137 and elute the radioactive Ba-137m into a liquid solution that is radioactive! This is how those radioisotope generators with the little syringe plungers at school work. Wait an hour and more Cs-137 will decay into Ba-137m, and you can re-wash it with the acid to get even more radioisotopes out.

In these software programs when you do a background calibration there are two different ways: start taking data to teach the program what the individual scintillations look like (with the radioactive sample placed at the detector) or left clicking the computer mouse while using BGO on/off (with NO radioactive sample anywhere near the detector).

One teaches the program what the target isotope radiation (which you are measuring) looks like, the other teaches it what the background cosmic radiation (to be ignored) looks like. If you confuse the two you'll never get your setup calibrated correctly.

An important part in Theremino is "tuning" the waveform in the "Pulse Shape Visualizer" window! Not much is made of it in the manual, but in online tutorial videos it appears to be the key to getting anywhere.


Another thing is time! I would get a spike where I should but everything seemed messy and not really convincing. Then I decided to let it run for a few hours and bingo: much more professional results in PRA. In Theremino I got very similar (and perhaps a tad better) results in minutes--but only after weeks of fiddling with various detectors and finally replacing the old 5M Ohm voltage divider ((below) end caps with a 62M Ohm one from Irad Inc. This gave the added benefit that my new Bicron detector would also would now with my Ludlum 3 survey meter. The Alpha Spectra Inc. worked with the Ludlum 3 already because it has a variable Ohm load up to 16M.


Here is the new 62M Ohm voltage divider. It has a BNC connector. The old one had an MHV (mini high voltage) connector that worked with BNC cables once you trim the protruding white insulation off the MHV connector. Coincidentally, this is why SHV (safe high voltage) connectors were invented: you can't accidentally or on purpose force them to work with lower voltage BNC connectors.


P.S. Here's the internet's only photo (as of 3/7/2018) of a "Keplertron" which is a low-energy beta Spectrometer:


Don't worry-this was suitably declassified before posting ;)


Mike