Showing posts with label Mike Logusz. Show all posts

Friday, August 21, 2015

The Power of Cold (and Hot) II: Thermoelectric Generator


The Power of Cold (and Hot) II: Thermoelectric Generator


A few posts ago (The Power of Cold and Hot) we looked at a Stirling Engine, which converted temperature differences into pressure and fast movement.

Now we are going to make a thermoelectric generator (and a thermosistor).


A thermoelectric generator converts temperature differences into electric voltage.

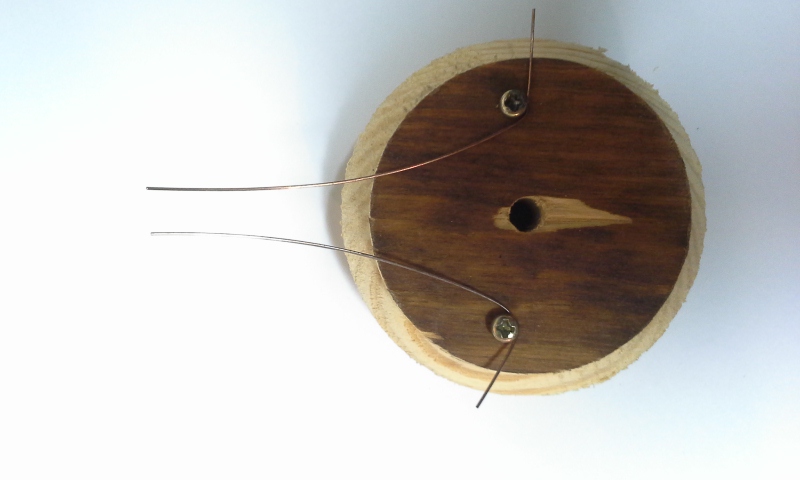
Two copper wires heated until they are crusted with cuprous and cupric oxide.

When touching, the wires are pressure sensitive and heat sensitive where they meet (pressure and heat at the junction cause Ohm resistance to drop). This is a thermosistor: resistance varies with temperature.

Heating only one wire causes Voltage to be produced. This is a thermoelectric generator / thermocouple. With only a butane barbeque lighter I can produce a consistent -5.2 mV (millivolt) when I apply ice to the other wire.

The weird thing is that the eV (electron Volt) work function is 5.2-5.6eV for cupric oxide and 4.8-4.9eV for cuprous oxide. Coincidence? Yeah, probaby...


Store bought thermocouples for home appliances produce 25-30 mV with 30mV being the norm.

I've looked at the work of Nyle Steiner who is a real whiz in many areas of electronics. Here's how I built my version:


Copper wire of equal lengths.


Wood disk and mounting screws.


Heating with a propane torch. It's hard to see here but the blue flame of the torch turns green after passing the copper wires.


Below you can see the scale left after heating. Red is Cu2O which is cuprous oxide (Copper I). Black is CuO which is the cupric oxide (Copper II). These oxides are used in semiconductors.


With two copper wires the hot wire output is negative voltage and the cooler wire is positive.  Nyle Steiner hooked 16 of these wires together and heated them. The result was enough voltage to light up and LED! 

Simple thermocouples like this are used to measure temperature in appliances: different voltages equal different temperatures. This is because temperature gradients produce an electromotive force (emf).

Here's a picture of my new Pyrometer (like a thermometer but for surface temperature). It can read up to 800° F and takes no batteries since the operating voltage comes from the physics we're discussing in this post.


Thermometers measure temperature. Pyrometers measure surface temperature. My pyrometer has a blunt tip for placing near the exterior surfaces of things that are very, very hot. Most thermometers are pointy for jabbing into things for interior readings: into a roasting Thanksgiving turkey, into container of boiling liquid, into your mouth, etc.

Newer pyrometers use infrared, lasery thingies that can tell you if the outside of your turkey is too hot from the other side of the kitchen! Here's a photo of mine:


Of course that's pretty useless since you want to measure the inside of the turkey. The problem is that thermometers need to touch what they're measuring, which is fine for normal things but not great touching something that is 800° F or way hotter like smelting metal! Because they don't have to make physical contact you can use a pyrometer to measure the temperature of a moving object, like a stream turbine.

Nowadays pyrometers also have probes for jabbing into things, so the lines are blurring even more. Thermometers generally are more delicate, require contact and can't handle high temperatures.

These sunny-side-up-eggs are starting to burn!


My pyrometer above is made by West Instruments, another company that makes this sort of thing is Borg. Yes, the same Borg from Star Track, or was is Star War? Anyway, BorgWarnet makes stuff for kitchen ovens, which is where I got the circuit board below, although the sensing portions and timer were probably made by Diehl. I think they're the same Borg that makes turbochargers for Detroit Diesel up the street.


...anyway, back to metal thermocouples:

With wires of two different materials, copper and steel for example, you create a closed loop thermocouple that is very similar to our Sterling Engine...but with electromagnetic waves!

All you have to do is solder the two ends of the copper and steel wire together. Then apply heat to one of the solder joints. The greater the temperature differential-the more mV it will produce. Since it's a closed loop of (two) wire there are no "ends" for positive or negative multimeter attachment so it's easiest to use a compass needle to observe electric (and thus magnetic) production. 

This is how Seebeck Effect devices such as this, Peltier Cooling Modules and Stirling engines can be used to produce electricity-some improvised units can make enough to charge a cellphone!

Like most things electromagnetic, you can use the output (voltage) and get the input (heat) just by reversing things. Running electricity through a shorted wire produces heat. This is called ohmic heating / Joule heating. It's why short circuits get hot, but it's also how a toaster works, and hot wire saws for sculpting sheets of foam for car seats. 


EMF: electromotive feline. The moving clouds and warm sun make me move back and forth. Meow!

Friday, August 7, 2015

See Atomic Particles With Your Own Eyes Part 4: Inferrence via Ion Induced Voltage Fluctuations (Welcome to the Ion Chamber)


So You Wanna See Atomic Particles With Your Own Eyes Part 4: Inferrence via Ion Induced Voltage Fluctuations (Welcome to the Ion Chamber)


There is more to seeing than what meets the eyeball.
-N.R. Hanson, Patterns of Discovery


We've explored actually seeing the paths of particles in a nuclear cloud chamber; watched corruscating alpha particles slam against a phosphor screen in spinthariscope; watched them explode when crossing the high voltage spark detector; found fields of activity with the radio telescope; and just horsed around with regular old Geiger Counters for fun. 

It's time to mix low voltage (8.5v) with soldering, multimeters and aluminum foil to make an Ion Chamber.

Simply put: we charge a cookie tin and have a wire inside that acts as a cathode. As ionized particles enter the chamber they create a current flow that is displayed on a multimeter. The higher the volts, the more ions which means greater radiation. 


Cookie tin. 


Screws that join the circuit board physically and electricity to the tin.


The cover of the tin becomes a circuit board cover.


I soldered a wire to the middle post of a Darlington transistor.  This is the cathode that passes through the bottom of the circuit board and into the tin. The Darlington transistor is actually two transistors in one package. The first part amplifies the incoming current, the second amplifies it even more!

A guy named Sid Darlington actually patented the idea of putting "two or three" components into a single unit back in the early 1950s. Not sure how momentous this was. Um, "let's moosh together two pizzas and make a mediocre double-pizza with a soggy crust center." Yeah, no! I think he actually figured out how to do it though, so it wasn't just the dopey idea of smashing them together that was his claim to fame.


Anyway, it acts like a single transistor but it amps up (high gain) the input. However the first of the Darlington ‘pair’ sucks up the voltage and responds in the circuit, leaving the second built in transistor a little ‘hungry’ for more. 

Think of it like two cats in a single cage: first one gets enough food, the second doesn’t so it makes for a really jittery pair of cats. That’s generally bad, but how can we use this to our advantage? 

Darlington Pairs are very jittery = very sensitive! They make create components in touch sensors. What are we doing? Well, we’re building a sensor that detects when it is touched by tiny little ions right? Great! How can we increase the jittery sensitivity of this? By adding that long wire to the middle leg of the Darlington transistor and extending it into your ion chamber. Neato!

Here's a photo of the wire coming off the Darlington straight at the camera.


By the way, I ordered the circuit board and transistor from Madscientisthut.com. They're neat people, ship fast and have cool stuff. You can order an ion chamber kit from them in various ways. In one of the kits they'll even through in a multimeter!! Or you can buy the board and source the parts separately from Radio Shack or wherever. I've found that usually on Amazon you have to buy 100 of the same components-it's cheap, but do I need 100 Darlington Transistors for $5 and free shipping? No, that's where kit designers like Madscientisthut.com come in and make everything easier.

I do order capacitors in bulk, because I get weird and blow lots of capacitors. A just received a bag of 100 capacitors from Amazon, which was a good deal and convenient...as you'll see in my next post about linear laboratory bench power supply making (there will be a loud bang and a little smoke!). 


Ok, here is the circuit board mounted on the cookie tin.


The inside of the cookie tin with the cathode wire in place.


The open end of the tin is covered with aluminum foil. I roughly zeroed out the meter.

Here is that meter during testing with a uranium test source (upper left above the foil).


Back view of the unit with the circuit board guard off and meter reading 15.1 mV. Notice the vial with uranium placed behind the ion chamber.


I moved the uranium to the front (sensing) side of the chamber. Notice the meter has started climbing.


Here's a nifty video I made of it in action. All of this was done before I properly mounted the circuit board deflector guard.


With the circuit board guard professionally mounted (with two different kinds of tape) I can now turn the unit on and use a plastic screw driver to zero in the unit by adjusting a 10k and  a 100k potentiometer through the holes.


Not something I'd have in my carry on luggage, but it works and only took me two nights to build.

The first night I was soldering and half my house went dark. Apparently the 240v electricity from the pole gets split into 120v when it gets to the fuse box. Sometimes with a blown utility pole transformer half the box can go out: either the left side (odd numbered fuses) or right (even numberr fuses) loses power. My basement, garage and half my kitchen worked fine.  All the other rooms had dim lightbulbs that slowly went dark.

"How can a soldering iron cause this?!?"

I finally looked outside and saw the street lamps going dark and realized it was a power line/pole problem. For a few minutes as I sat in complete darkness holding a blazingly hot soldering iron I thought I fried my house wiring.

I got to bed at 3am with a power company using a gas-powered generator backfeeding the pole by my bedroom window. Backfed with a regular old orange extension cord up the pole.  It's very important to wire in emergency generators for your home properly: if you backfeed your house with a male plug to your wall you can kill a utility worker.


Wait, so it wasn't the catnip, er, I mean soldering iron that made the lights in the house look like lava lamps? Still seems dark in here, I can't tell if I'm standing in a pile of loose Darlington transistors or those 10uf decoupling capacitors for the laboratory power source being built for the next post...meow.

Monday, July 27, 2015

Making Waves: Oscilloscopes, Lissajous and a Smattering of Cymatics


Making Waves: Oscilloscopes, Lissajous and a Smattering of Cymatics


Lissajous Figures are curves that are complex enough to make a pattern. These patterns are great tests for oscilloscopes because you can learn information from them by looking at how they move and their shape. They can tell you the frequency, phase, and even angle ratio which you can then look up in a trigonometry sine value for the phase angle of two waves: which lets you figure out the power factor of an electrical component.

Sine waves: sin and cosine. Get it?


Above is a circle I drew with a triangle. The bottom of the triangle is cosine. This is a 45° triangle. Trigonometry and Lissajous Figures are ratios. The ratio of cosine and sine is 70.7% and the angle is 45°. So, sin45 = 0.707. The same priciple applies to waves, but showing it on a circle is easier.

Fancy-smanshy, but we're just looking neat waves here. Lissajous waves are beautiful and quite reminiscent of Art Nouveau "whiplash" style curves and lines used in everything from painting and sculpture to wild furniture and architecture.


So who discovered Lissajous Figures? A man named Nathaniel Bowditch of course! Huh? Yeah, Bowditch experimented with them for a while, then like 50 years later a guy named Jules Lissajous attached a tuning fork to a lightbulb to create these patterns. Previously, people would use a pointed pendulum swinging through fine sand to create what much later became known as Lissajous Figures. I used an analog synthesizer and an old oscilloscope.


I also put a second line out from the synthesizer to a speaker so I could hear the waves while viewing them. A brand new 20Mhz probe and BNC female to UHF male adapter round out this setup.


Lissajous Figures are easy to use. You just count the loops running across the top of the pattern and down the side. This gives you your ratio, a 3 to 1 means 180 cycle voltage, 3 to 5 means a 60 cycle signal, etc. You set the signal input and then calibrate the oscilloscope by at adjusting until you get a familiar pattern. In the above video the settings I talk about are on the synthesizer, not the oscilloscope: I was going for beauty and variation, not calibration.


There are tons of ever more complex Lissajous Figures / Bowditch Curves. Above are the most common ones you'll probably encounter.


Another type of waves are Chladni Figures after Ernst Chladni in 1787 (later renamed Cymatics in 1967 by Hans Jenny). So, who first investigated them in recent times? Our poor, old friend Robert Hooke! You remember him right? He was the guy who discovered "Newton" Rings and "Newtonian" telescopes. I guess we should count ourselves lucky these aren't called Newton Figures.

Cymatics is sound waves directed through water.  Chladni used sand on the bodies of acoustic guitars, but the principle is the similar; although the sand forms geometric patterns that are more hard edged. Here are a few variations of Cymatics waves:


At 456 MHz the water spattered out of the plate:


Shocking and messy!


Here are some still photos of various Cymatic waves:


Chladni Figures are usually made in sand on flat plates. They're basically Cymatic waves in sand but there is a huge difference in how they look because the sand bouncing around, while the sound waves push the water into itself, bumping the waves along: which is why sound travels 4 times faster in water than air! Of course sound moves fastest through our good old friend beryllium from my neutron gun experiment. 


Chladni Figures, related to Cymatics (water and sound waves) showing sounds creating patterns in sand. For more geometric results a square plate and direct vibration coupling works much better. I was piping sound to a metal file cabinet, which then went to the small plate. At first I was bummed they weren't geometric, but after extensive image searching I found exact pattern duplicates from someone using a wooden desk with no plate.

This was just a spur of the moment test after looking at Lissajous Figures on my oscilloscope at 2 AM waiting for the cloud to clear so I can drag my telescope outside.


Here's another attempt:


Again, I found this same pattern duplicated by someone else, so I wasn't totally annoyed at the less-than-awesome pattern. I think once I get a perfectly flat metal plate instead of a slightly domed dish (which was levitating off the surface due to the sound pressure) I think I'll be able to get the hard edged geometric lines. As Paul Camp said, "There is a balance between discovering for oneself and being told."

I'll also be able to better acoustically couple the metal plate to the sound source. I'll update here once it's done, but I'm working on some other projects first.


Just make the noise stop-I can't cover my ears! Meow.

Wednesday, July 22, 2015

Non-Newtonian Fluid is the Best Kind of Fluid


Non-Newtonian Fluid is the Best Kind of Fluid


In my continuing assault on Isaac Newton I will demonstrate how boring old Newtonian fluids (like water) are less fun than non-Newtonian ones. First, we need to get our hands on a non-Newtonian fluid.

To make a non-Newtonian fluid we can just mix laundry spray starch and white glue. This will make a shear-thickening non-Newtonian fluid. Under stress it thickens and hardens (increases viscosity), once the stress passes it turns into a runny liquid. Put it in a cup and its like white glue you can stir with your finger. Poke your finger into the cup forcefully and it will harden into a single blob and you can pull it out of the cup!

Here's how quickly it is to make, it's actually easier without the gloves-they're too slippery to get a good gauge on the mix:


Here's my non-Newtonian fluid in action. Slap it and it hardens enough to let me peel it up off the plate. Wait a second and it'll drizzle down as a liquid:


There are many variations of non-Newtonian fluids besides shear-thickening ones.

Ketchup is a shear-thinning non-Newtonian fluid, which is why people smack (shear) the ketchup bottle to get it to thin and flow out faster. Xanthum gum is added to ketchup for just this effect.

If you put this spray starch and white glue mixture in a ketchup bottle the only way to keep it from pouring out would be to keep smacking the bottle! If you wanted it to thin and flow faster your just leave it alone for a few seconds. If you slap it hard enough it will instantly harden and break into two pieces, only to flow back together of left alone for a few seconds.

It seems pretty weird, but I've dealt with having a non-Newtonian fluid and the problems that it can cause:


I play a variety of bowed instruments. Rosin is used on the bow to let it grab the strings of the violin, cello or as in the photo above a double bass viol. The rosin looks and feels like a cube of yellowish glass:


This is the harder rosin I've used for years, but recently I started playing the huge upright double-bass which required me buying newer, softer rosin. It's in the red canister next to the violin. The softer rosin seemed like regular rosin: hard, produces a white powder when rubbed with the bow and will shatter into a zillion pieces if hit with a hammer; however you leave the canister on its side after a few days the seemingly glass-like rosin will ooze out. Leave it as a blob on a shelf and it will slowly pancake out: spreading and flattening, and eventually oozing off the edge.

Now, some people will tell you that regular old glass is a fluid that oozes over time, but they're wrong. Glass is a solid, although it isn't a crystallized solid so it's an amorphous solid. Crystals are rigid lattices of ordered molecules. Fluids and gases are unlatticed unordered molecules. Glass is unlatticed, unordered yet rigidly bound. Glass is a solid.

Most rosin for instruments is a solid, so solid on fact that it sometimes crystalizes. However bass rosin is much softer relative to regular rosin-although if you found a piece on the sidewalk you'd probably assume it was a chunk of old, broken glass.

Common myths: old glass windows are thicker at the bottom because the glass oozed down. Wrong: the spun old glass and cut it, the outside edge was always thicker and it was installed thick edge lower. A glass shelf will bend in the center over time so it's an oozing liquid. Wrong: it bends for the same reason wood shelves bend, it was too thin and/or too overloaded or gravity just got the best of it.

Polymers are repeating molecular units. They tend to create semi-crystalline structures and glasses. It tends to make things "plasticy" and in fact it gives the name for polystyrene is polymer of styrene (styrene being obtained from benzine).

What else has a crystalline structure? The starch spray in our non-Newtonian fluid. It has a semi-crystalline structure, that helps bind the glue into big molecules that are a polymer. Starch itself is considered a polymer. Adding a little borax powder* to the mix would make it a stronger polymer--strong enough that it would stop being a thinning/thickening liquid and become a rubber-like blob that you could throw and bounce off the walls. If you add an enzyme it will break the polymer up into smaller units (monomers) which changes its properties. Stringing together units of silicon yields a semi-liquid silicon polymer, which we call Silly Putty!

*Borax powder is sodium borate a natural compound of the element boron, which is what you want to get in the laundry aisle.

Boric acid is hydrogen borate is an acidic form of borax that is either a natural compound or manmade using the element boron with sulfuric or hydrochloric acid; as such it is acidic. Borax crystals are usually crystallized boric acid. They are sort of not the same. Kind of like ice is frozen water and good for putting in soda, ice dipped in acid is not quite the same.

Boron is B
Boric Acid is H3BO3
Borax is (NA2B4O7)(10H2O)

When dry boric acid crystals are added to water it grabs electrons and becomes weakly acidic. This weak acid is used in eye washes and hygiene products to combat yeast.

You'll also remember boron in its elemental form has awesome properties when used to lace blocks of paraffin wax during out experiments with slowing down radioactive neutron particles in my previous post "My Radioactive Dime".


Where else is boron/borax used? Taxidermy!


This is part of my Game fowl Collection: photo-books by Hiro; my bird Alouicious (named after the teddybear from Brideshead Revisited); and copies of Feathered Warrior (a catalogue where you can buy fighting spikes and the live-fertilized eggs of *past* fighting champions). 

Alouicious is actually from an organic market in Rochester Hills - not a fighting bird (so if you were upset when you thought he died in a cockfight, but relieved he was just normal food-then you're a hypocrite, unless you're vegan). LOL.


Here's a pic of my room-mate Boris the Book Boar visiting Melvindale Public Library during a charity event.  He came all the way from the Black Forest in Germany!

As you can see, boron is very useful! But enough of boron for now, it's time to get back to starchy polymers...

Boron has an incomplete set of electrons (in a compound) and seeks them out to bond with. This gives boron (not boric acid) many uses in the adhesives industry, including mixtures involving our good old friend starch! I see this all the time (I'm a librarian) in bookbinding pastes. One great glue for paper (used to make cardboard poster tubes) made from a water soluble synthetic polymer is polyvinyl alcohol (PVA) with boric acid added to it. 


Usually polyvinyl alcohol (PVA) has a formula of (CH2CHOH)n), but this particular chunk of PVA is actually:
 (-(CH2CHOH)n-(CH2CHOOCCH3)m-)

PVA is sorta weird in that it's not made up of chained monomers, it's polyvinyl acetate that is polymerized, and then the acetate is converted to alcohol! It's very bouncy:


PVA is  (CH2CHOH)n or it is -(CH2CHOH)n-(CH2CHOOCCH3)m-
Glucose is C6H12O6
Starch is C6H10O5

As a side note: the specific gravity of this PVA ball is 1.24 according to the MSDS (Material Safety Data Sheet) provided by the manufacturer, Chang Chun Petrochemical. It sinks in water, but if you tip the bowl it's in it only slowly rolls to the lower side.


Here's a weird enzyme vs polymer test: chew a saltine cracker. Your saliva will break up the polymers and the crackers will get sweeter and sweeter as you keep chewing (and not swallowing) and adding more crackers. The monomer of starch is glucose. Glucose is a simple sugar. Simple sugar is sweet. It's the enzymes in your saliva (not the acids) that do this.

As a polymer, starch tastes like bread or potatoes. Break it up into its glucose sugar monomers and it's sweet! Glucose attracts water around it. Starch just attracts other starch around it. Glucose grabbing water can cause swelling and other problems-especially in the bloodstream of humans. It also causes plants (which store sugar/energy in the form of glucose) to need more water to make the glucose happy. The result is thirsty plants.

Many plants have wised up and stored their glucose in the form of longer chains of starch: the plants aren't so thirsty and the starch isn't bothered by whatever water is in the plant (too much water can mess with the glucose storage). Glucose in plants and animals calls for a balancing act with the amount of water, starch doesn't really care so much.


So...I guess have to find someone besides Newton to blame for the constant barrage of cantaloupes "oozing" off the glass table? Cantaloupe polymerization via face rubbing? I don't want to be taxidermied. Meow.


Oink!

Sunday, July 12, 2015

See the Sun (Chromatically Abberated) Part II


I Want to See the Sun (Chromatically Abberated) Part II 

There is more to seeing than what meets the eyeball.
N. R. Hanson

Speaking of reducing chromatic abberation (in my last post) there is a device that actually increases it...on purpose! It's called a prism. We'll deal with sunlight, rather than the sun itself for now.

Here's a photo of an incredibly awesome prism that really separates the wavelengths of light really well. The craftsman that cut and wet sanded it is an incredible optician: me!


If the glass were perfectly, magically clear it wouldn't work as a prism. The differences in color absorption due to the refractive index, which in turn disperse the colors (breaks white light into a rainbow of its constituent colors). The speed of light changes in different media (air, water, glass) This is a dispersive prism.

If the surfaces are nicely polished and you blast a laser through it, it can act as a simple reflective prism. Lasers are a single wavelength and thus cannot be broken up into rainbows. They are one color only. 


Here's my same prism with a laser blasting through it. No dispersion-no rainbow. It does refract-changes directions at an angle. This is mathematically referred to using Snell's Law and Ray Tracing (computing the angles the laser will exit a prism, or a bunch of prisms and mirrors and lasers in a huge system like a knowing where the ball will go in a pinball machine before you fire it).

So pretty, but useless? Not by a longshot! 

In addition to aiming lasers (boring) you can use knowledge of dispersive refractive indices and wavelengths of light to investigate chemical properties of objects (and stars) you can see but not touch!


Above is a photo I took of a diffraction grating. It's a tiny, cheap $2 piece of plastic that disperses light. The white source light is at the top. The grating has zillions of tiny grooves that act like prisms. 

What is similar to that? A compact disk, which has zillions of pits in it that do the same thing. That's why you see a rainbow on the bottom of music CDs. So I took a CD and put it in a box with a tiny slit to let on light:


This my homemade spectroscope's readout from a fluorescent light bulb. Notice how there are lots of blank spaces in between the color lines? Newer light bulbs are more like the laser than sunlight: way fewer wavelengths to disperse. Here's the cooler part: see the green line? That corresponds to the element Mercury. We now have proven that this fluorescent light bulb contains Mercury in it! We didn't even have to cut it open or touch it at all. 

Astronomers point spectroscopes at stars to learn what elements are burning within them. Same exact principle.

Building a CD Spectroscope is easy. Here's a link to a nice set of instructions: https://www.cs.cmu.edu/~zhuxj/astro/html/spectrometer.html

Is there a way to take what we learned from the last post (PVC Telescope) and use it in spectroscopy? Yes, you can make a Slitless Spectrograph:


However, if you do the Ray Tracing in real life its not a straight line like my drawing above, it's like a downward curved line which is annoying to put into a box and more annoying to hook to a telescope which was my original purpose.

Anyway, I had so much fun with my homemade toys that I ordered a fancy store-bought Spectroscope from Amazon for all of $9 including postage. 


The readout was identical to the ones i made, except that it has a scale to show you the actual wavelengths (in nanometers). Fancy!


On the right you can see the white nanometers scale above the colors. This is pretty even with no black missing lines, so this was probably sunlight on a nice day with no clouds. 

Man has closed himself up till he sees all things
 through the narrow chinks of his cavern.
William Blake

The only difference between my free CD spectroscope, my $2 diffraction grating Spectroscope and my $9 spectroscope is that the $9 one had a nanometer scale. Same readout on all. 

Now, is there a device that melds spectroscopes with prisms? Yes. They're called prism spectrographs. They also make use of Snell's Law and Ray Tracing to get light to pass through a few (usually three) prisms.


In the above pic notice the trapezoid formed by 3 prisms smooshed together. The scribbling is me feebly trying to start figuring out what shape prisms I needed to grind. I wrote "Snell's Law" but it's just part of calculating total internal reflection. I wisely decided manual Ray Tracing would be easier: shine a laser through the prisms and see where it goes, which is what the red laser photo at the beginning of this post shows...so finally, for the first time in human history lasers actually did something useful: lasers kept me from having to calculate inverse trigonomic functions for the angles of incidence

As an aside, in not bothering with Snell's Law (named after a guy named Snellius but discovered by Ibn Sahl in the 900s) and playing with Ray Tracing I can also find and deal with any bits of light that doesn't confirm to Snell's Law. Specifically: Newton Rings!


Newton Rings are those weird rainbows that occur when you lay to almost flat pieces of glass on top of each other. They were of course discovered by one of my heroes...Robert Hooke. Isaac Newton played with them over half a century after Hooke wrote about them, so that's where the name comes from. That was almost exactly 300 years ago. The rainbows come from diffraction, not of the glass but because of tiny air pockets between the glass. Shown are two microscope slides I randomly selected: Rings! Actually these look more like wavy lines, but as I squeeze the lines move and change. Interference also plays a role: like throwing two rocks into a pond, the waves from each will eventually touch and mess with the patterns of each alone.

An even weirder aside: Hooke was the first to build a Gregorian Reflector Telescope. It was designed (by James Gregory) before another guy built a reflector telescope, but wasn't made until a little after the other guy did, which is why most reflector telescopes are now called Newtonian Reflectors. Yep, good old Issac cheated Hooke yet again! Gregorian telescopes still mostly survive in very nice, easy to design and build Schmidt-Cassegrain telescopes. Isaac Newton did invent calculus all by himself, or at least he claimed to have done so a few years after Gottfried Leibniz published a paper on the new math of calculus he (Leibniz) invented. In fact we still use Leibniz notations to this day!

Newton is often quoted, "If I have seen further it was because I was standing on the shoulders of giants." This would seem to be a fair acknowlegement and reconciliation-except that he ripped that quote off from Bernardus Carnotensis. Newton: pickpocket of science.

Is that all? Not by a long shot! In addition to identifying burning elements in laboratories and in stars you can do something else with a spectroscope. Calculate Radial Velocity! If an object space shows a slight increase in red wavelengths it is receding away from us, blue means it's floating towards us! Neat. It is the color wavelength version of The Doppler Effect for sound waves.  A passing police car's siren is high pitched when it's coming at you and then goes to a lower pitch (at least it seems to for you) as it passes.

As the car approaches and passes you standing still:
eeeeeeeeee-aaaaaaahhhh. 

To the police officer in the car the siren doesn't change pitch: eeeeeeeeeeeeeeeeeeeeeee.


Shhh...I'm analyzing the sunlight. Ten nanomices and rising-meow!