Sunday, October 16, 2022

Digital caliper battery eliminator taig lathe


So I have digital calipers on my Taig lathe to measure .00015" or .01mm and they take an LR44 1.5v battery.

The battery drains even when off so I found a 1.5vDC wall adapter and wired it up. Weirdly, under this very light current (amp) load it was giving almost 3v.

So I put a resistor on the negative wire. I tried a few and either got: nothing; all the numbers showing 888888; or almost zero but when I hit the "zero" button it would jump to .0005 or 6 or 7. I tried a bunch of resistors until the 51k Ohm resistor let me hit the zero button and the display stayed at .0000"  or 00.00mm. 

Since the 1.5v setting on the wall transformer was putting out 3.3v that means I can replace it with a less odd USB cable (although many are 5v). I'd probably have to change the resistor for a slighly higher value.

I works and no batteries needed.

2.8v or 3.3v we don't care, meows!

Saturday, August 27, 2022

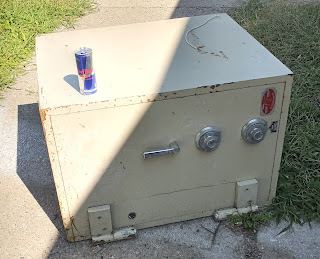
Safecracking open a safe with magnet

 Opening a safe with a magnet


You're like Felix the cat with your bag of tricks!

Monday, August 15, 2022

Glyomorph Glyos + xenomorph


I kit bashed an Onell Design figure called Pheyden into an alien xenomorph. The Glyomorph! 


It uses the Glyos peg system to have interchangeable hands, feet, limbs, heads, etc. with many designers.

Here is the Pheyden figure:


I put an extra small head on him and him backwards:


Two part Aves epoxy clay parts A and B kneaded together gives about a 4 hour working time before it air dries:


Ended up doing the tail in two parts and gluing together afterwards:


Inspired by: Crafsman Steadycraftin and AC Toy Design and Onell Design.

I also made a Cataloging Librarian action figure and made a silicone mold of it and blasted out resin copies in various colors using Smooth Cast 45d and 65d resin, ignite pigments and a vacuum degassing for the silicone and pressure pot casting for the resin in the mold:


DeVilbis painting pressure pot:


With l that safety stuff removed to allow 60psi to squeeze any bubbles in the resin to microscopic size:


Vacuum chamber I made for a fusor device repurposed for degassing the silicone mold making liquid:


Wednesday, March 16, 2022

Logic analyzers and Alarm System Jamming and RFID Security Decoding + Logic Analyzer and Wiegand


LOGIC ANALYZER AND PROBE + PULSEVIEW

I started logic analyzing a 16F916 chip in a wireless thermostat using PulseView (free software from Saleae) and a generic logic analyzer hooked up to the old Linux laptop.

It turns out PulseView has decoders for Wiegand...the protocols I was using while decoding and cloning RFID security dongles and door access cards! Remove the data analyzer and put on an antenna: sucking up all that Wiegand security info. Record and play it back.


Here is just the little logic probe pen (in case you've never seen one before). I just buzzes and squeals and lights up with up/down arrows and that shows up where the logic is going or coming from.


Here is the logic analyzer with it hooked up to legs of the microchip; this shows the physical setup and screen results (see software settings below):


This is the 16F916 chip I was first playing with:


Below are the nice and easy settings I used in PulseView for the logic analyzer (the thing with the red wire clippy things--not the pen-shaped probe thingy which just buzzes and lights up). Saleae has a free download on their website, but since I was using the tiny old Linux laptop I added it via Linux Package Manager. 


Oh look, some Wiegand security info. Hmm...stream state and bit values. Sniff out the security signals and then see the binary values.


So what can you do with this setup? Alarm system sniffing, breaching and JAMMING!


For right now let's forget about the Wiegand stuff and focus on a simple wireless alarm 433Mhz 866Mhz jammer and sniffer:


A Baofeng GT-5R radio can be used to jam home alarm systems. Many home alarms operate wirelessly (window, door, hallway sensors) on either 433Mhz or 866Mhz. This cheap, $25 radio can transmit on 43Mhz--while doing so it also sends out a frequency at double the Mhz...which just happens to be 866Mhz. 


You can see the little burbling waves of the background 433Mhz devices...and then see them all drowned out by the 5 Watt radio. Now, you have to remember that 5W is way, way more powerful than what all the little infrared wall mounted sensors and cameras are putting out, so the radio easily drowns out pretty much the entire alarm network (and all the neighbors too). 


This radio receives 144Mhz-148Mhz, FM radio and it can also TRANSMIT on 420MHz-450Mhz. 


This was tested on an installed alarm system and WORKED. Holding down the transmit button allows you to open doors/windows and walk past room/hallway sensors without setting off the alarm or even getting an interference warning from the alarm main box! The sniffer is an RTL-SDR dongle, hooked to a MooElec Ham it up box running into a laptop (running linux mint, but it works on Windows). The antenna is a simple telescoping AM/FM type antenna and the antenna on the transmitter is the cheapie one that came with it. The software to see all this awesomeness was CubicSDR with basically the default settings.

This post is like 8 different things smooshed into one: alarm jamming, Wiegand RFID keycard and dongle cloning (much more on that later), logic analyzers and probes, logic protocol decoding, PulseView and cheap radio alarm jammers (more on that later too). I'll edit out some and try to separate this all...basically the little Linux laptop is now the center of a terrifying, portable electronics warfare setup. LOL!

My QA answer for someone using a cheap logic analyzer:

For Linux go to software packager and install "PulseView" and then install "sigrick-firmware-fx2lafw" which is the driver for this.

Start PulseView and this should show up.

If it doesnt click the downward arrow on top center edge of screen and select "connect to device" and select "fx2lafw" which will show the device as Saleae Logic. Click run.

You need to have this hooked up to something. I used a wireless thermostat and hooked the ground wire to the spring holding in the AA battery powering it.

I hooked the CLK wire to a clock leg of a microchip inside of the thermostat and randomly hooked some other wires to other legs and clicked run: awesome!

I am a complete novice with Linux and logic, lol!

M1K3 FR0M D3TR01T


Monday, February 14, 2022

Push-Push Cardioid Curve Latch


Just made a Cardioid curve push push latch with my new milling machine and drill press. The straightaway is lower than the diagonal path so the pointer can't go up the diagonal, only down it on the return.


Scrap aluminum, wd-40 as cutting fluid. Little Machine Shop manual mill.


Angles milled by just turning the rotating base machine vise and locking it down again for each angle. 


I saw This Old Tony make a similar one (though he used a CNC machine) and figured if I changed the return curve to a properly angled diagonal I could make it with my manual mill. So I did!

There is less friction that way so I could use a weaker spring.


Cardioid = heart-shaped

I did this while avoiding a cardio-workout of snow shoveling.


Happy Valentine's Day 2022!


Friday, February 4, 2022

Watchmaking Machinery 4: Rotary Table and Indexing Head with Plates

 Watchmaking Machinery 4: Rotary Table and Indexing Head with Plates


This is a 6" Rotary Table with  a 3-slot plate. Normally 4 slots are better, but I'm using the bore hole. The bore at the center of this takes MT2 (Morse Taper #2) inserts. I have (not arrived yet) an MT2-to-ER32 collet holder. 

Table MT2 > ER32 Collet Holder > ER32 Collet (various sizes) > Mandrel > Blank I'll cut into a gear.


This is one of the division plates. The holes are used to index the rotation of the table to a certain number (or multiple/division of non-Prime numbers). You hand crank this and go one-by-one.


This is a photo of the hand crank. It's in my milling machine because the slot was about 0.8mm too narrow to fit over the shaft it has to mount on. So I milled it larger (0.3mm off one side and about 0.5mm off the other to try and center the slot). I went slow and got it fitted nicely.

The only other issue was the pin that retracts and then pokes into the holes. It was very scratchy and binding. I took it apart, wiped off the thin grease, cleaned out some grit(?) and then it seemed to work 90% better. I think the spring binds a little since the tolerances inside are so tight. I could get (make on my lathe) a different spring but I'll see if this wears in better.

WHAT A PAIN!!! But the table was cheap and shipped (and arrived) in less than 20 hours...during a blizzard! The table rotates buttery-smooth. Totally worth it.


Gear Generator dot com! You can put gears attached to each other on the same axle. Very useful for lunar gear trains.


It was so cold and windy and slushy and snowy that this squirrel came to dry off in the blue jay nest by my side door.


Saturday, January 8, 2022

Moon Phase Lunation Gear Train for watch


Moon Phase Lunation Gear Train for Watch


How do you design a simple gear train to allow a watch or clock to show the phases of the moon accurately? Well, a lunar month is an average of 29.5 days long. It's kind of hard to make a gear with 29.5 teeth--specifically the ".5" tooth. You can't really have half a tooth on a gear.


So, double the 29.5 x 2 = 59 tooth gear. You paint two little moons on the gear and have a little pointy lever poke at the gear once per day. One of the moons will slowly go beneath a cutout mask in the face of the watch clock. The next month will have the other moon slowly emerging.


Unfortunately lunar months are actually 29 days, 12 hours, 44 minutes and 2.8 seconds long and they basically plus or minus up to 7 hours over the course of 9 year cycles. A 59 tooth gear will by off by one day every two years!


What gets us closer to the 29 days, 12 hours, 44 minutes and 2.8 seconds = (29.53059xxxxx). Or if you want to make it easier twice that which would be 59.061 days for two lunar months?


You want to have a set of gear and pinion (smaller gears) teeth that are whole numbers.


35 x 40 x 71 divided by 9 x 11 x 17 = 59.061. These six gears give an accuracy of losing a day every 6661.3 years. You and your ancestors will never have to adjust this watch.


You attach this set of gears to an hour-hand gear. The gears are paired on 3 shafts like so: 9/35 and 11/40 and 17/71. 


On the 71 tooth gear you paint a nice little moon.


Above all these gears you put an stationary egg-shaped mask that covers more and more of the little painted moon as the gear turns day after day, eventually turning the full moon into a crescent and then it disappears--only to reappear on the other side as a growing crescent then into a full moon!


Sound complicated? Nope! I made a working model out of paper. The clock face is white with a cut out and a non-moving black mask. 


The 71 tooth gear is orange with a white moon on it.


As the orange gear spins you see less and less of the little moon because of the stationary black mask. Eventually the moon turns into a sliver of a crescent. As you can guess, when it keeps revolving it will pass the top of the black mask it will start growing again.


I haven't gotten my hands on a rotary table dividing index head for my milling machine (yet) to make the physical gears out of brass; but all this seems to work on my crummy little paper and cardboard mock ups. 


Who would need a watch that displays the phases of the moon accurately to within 7 hours over the course of over 6000 years? Hmm...I dunno, a werewolf?


Can you make a lunar watch even more accurate? Yes: but you need gears with over 800+ teeth--and that would be immensely difficult to make in my basement. Also the gears would be the size of hulahoops.


Some Serbian college professors and grad students came up with sets of real number rationalization permutations for these gears...and I found an error in their math! They had a 2 to the 3rd power instead of 2nd power. But, it turns out when you factor it all out that's what gets rid of having to draw a second little moon on the 71 tooth gear. https://www.researchgate.net/publication/265859964_SYNTHESIS_SOLID_MODELING_AND_WORKING_SIMULATION_OF_MOON_PHASE_CLOCK_MECHANISM 


#0 - N9 - ratio: 1:1 - RPM: 30

#1 - N9 - ratio: 1:1 - RPM: 30

#2 - N35 - ratio: 3.89:1 - RPM: 7.71

#3 - N11 - ratio: 3.89:1 - RPM: 7.71

#4 - N40 - ratio: 14.14:1 - RPM: 2.12

#5 - N17 - ratio: 14.14:1 - RPM: 2.12

#6 - N71 - ratio: 59.06:1 - RPM: 0.51

I might find some kid to build this out of Legos for  me as a test.