Saturday, January 2, 2021

Security Banknote Features


Security Banknote Features


PLEASE NOTE:  THIS POST WILL BE UPDATED WITH MICROSCOPE PHOTOGRAPHS OVER THE NEXT FEW WEEKS! 

Here are some security banknote (money) features used to make counterfeiting more difficult. Just fun junk drawer stuff. Some of these features are obvious when pointed out to regular people. Some of them are invisible unless you use an ultraviolet (UV) light.

Some features like OMRON rings are only supposed to be detected by scanning computer software (like PhotoShop) and color copiers and flatbed scanners which will then automatically refuse to scan or print a copy of the money--but you can see them if you know where to look! Sneaky!


In fact, let's start with the most shocking one: OMRON rings, which are also called the EURion constellation.


OMRON Rings in US money (and many, many, many other countries' money too)!

This pattern of rings is the "EURion constellation" aka OMRON rings. It looks a little like the astronomic constellation Orion. These rings make a precise pattern.


Look at the back of a $5 or $20 bill like in my photo. You'll see a swarm of yellow "05"s or "20"s in a sort of cloud. Here's the tip-off: why would you put a zero in front of the five? 05 instead of just 5? If you take a marker and put a dot in the center of each of the zeros you'll notice then that the zeros make up a bunch of EURion constellations. TRY IT AND SEE (OR SCROLL DOWN)!!!


Anyway, if you try to scan these bills with PhotoShop or a color copier or a flatbed scanner or other high-tech device the device can sense the EURion constellations and it will stop scanning. Theoretically it could stop scanning and contact the authorities. Mostly it just locks up your software or hardware and it refuses to copy and/or print.

There are other bills that similarly lock up software and hardware that don't contain EURion constellations...so there are other patterns out there that act the same way!

Too broke or lazy to connect the dots? Here ya go: a USA $20 bill with the EURion constellation filled out in the zeros. 


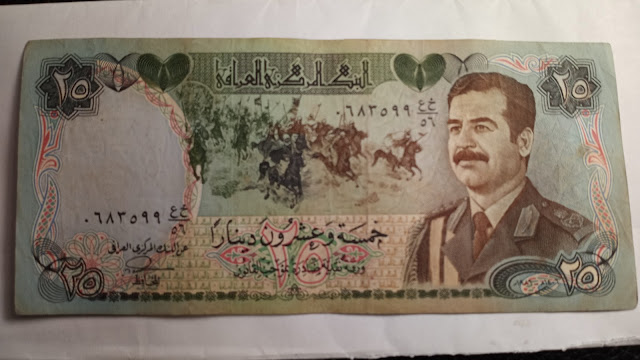
Here is a really nice Iraq 25 dinar banknote showing Saddam Hussein.


Here is the the 25 dinar under ultraviolet (UV) black light. Along with the stunningly beautiful color changes to the front and a cleaner, less cluttered looking back we see the glowing aqua-colored Arabic 25 next to Saddam's right shoulder. On the back is the pear-shaped Al-Shaheed Monument in Baghdad. It is dedicated to the Iraqi soldiers that died in the Iran–Iraq War. There are a lot of people who invest in Saddam dinars--because they are getting scammed! The were only worth around 4000 dinars for a single USA dollar. Generally when a country has a living guy on their money and that living guy gets executed that money is then worthless!


Ukraine hryvnia (hryvna, or sometimes hryvnya) in two denominations. 


Both these Ukrainian bills feature intricate background patterning that is created by a single, continuous line. This fine printing is hard to duplicate and hard to photocopy. Guilloches are wavy geometric patterns that follow mathematical formulae. Guilloches and just fine lines are used in most banknotes. 

These bills also have very brightly glowing UV inks in rather large areas on the fronts and UV threads sprinkled on their backs. Strangely the 5 hryvnia note basically sticks with yellow and a yellowish green, the cheaper 1 hryvnia note at a glowing pink UV ink into the mix--although both notes use a beautiful orange UV ink for the serial number on their backs. 


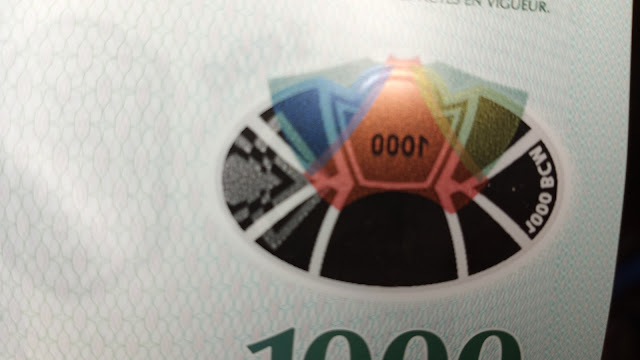
The glorious 1000 ouguiya note from Mauritania!


Where to start on this wonder of technology. It's a polymer banknote that feels like plastic (not paper) in your hands. In the upper right you will notice a set of 12 depressions (raised bumps on the back). These are braille dots and a "tactile" feature. 


There is dynamic color-shifting ink on the front right that is overprinted on a clear viewing window! The pattern is a central red triangle with two green wings that change depending of the angle of the viewer to a red triangle with a blue and a yellow wing. This is effect is made by Innovia Security and is called an "optically variable element with a polychrome effect aurora". It's layers of semi-transparent pearlescent inks. They look different if the light source is behind or in front of the banknote. 


There is also some very nice overprinting of circles at the bottom of the bill.


There is an extremely bright block of UV ink showing the 1000 denomination on the back and a very subtle glowing of the serial number too.


A very busy 10 dollar Hong Kong note.


The Hong Kong polymer note is very light and plastic feeling. Very slick and weird.


We have another transparent window with an overprinting of something similar to optically variable element ink. It's called Dynamic Color Shift G-Switch and the colors go from pink of blue to a coral orange to a beautiful pearlescent lavender. You have to work to get the effect buy spinning the dollar around and tilting it and walking around the room--but when it happens it's very impressive! I still don't know what the ribbon (?) or eel (?) color changing thingy is on top of the bauhinia flower. 


What the blue splotch turn into a horse when held up to the light.


A half pink and half blue horse (or unicorn?) shows up. The blue half is printed on the front and the pink on the back. 


You also get a huge blast of UV ink denoting the "10" dollars. Very bright white square. 


Here's another super-bill: a polymer Mauritius 50 rupee bill that's got a lot going on.


The optically variable ink with color shift effect has a "swing" effect element to it. Look at the right of the note and you'll see a white dodo bird with "RS 50" printed on a clear window. Moving the bill and light sources makes the "RS" turn blue and turning it another way makes the "RS" turn yellow. The same for the "50" --it can be white, blue or yellow too!


More raised braille dots called a "tactile feature". On Canadian money it's much easier: a block of 6 dots equals $5. Two blocks of 6 = 12 dots = $10. Yes, 6 = 5! Ugh!!!!


Nice center block of UV ink and other spots too, including the serial number.


Under UV light the back of the bill has a glowing "50" and the word "Bom" repeated over and over so it looks like "BOMB". Maybe they were Ricky Martin fans "shake your bom bom" --LOL!


The Bom Bom shows up if you tilt the bill just right as very similar to a glossy spot printing, like on some hardcover books. It looks like it's printed in perfectly clear ink laying on top of the bill--until you turn a UV light on.


Behold the glorious 5000 peso note of Mexico!


This 1985 note has seen a rough life, but under UV light it does glow--uranium yellow racing stripes all along the back. Kinda neat, but I'm not even sure it's really a security feature, it might have just been some ink that also happened to fluoresce. I look at pieces of junk mail under a UV lamp for fun and sometimes things light up.


What are the odds of another 1985 Mexico banknote--and this one is 10,000 pesos!


Hmm.. what's that suspiciously empty area to the left for? A watermark that shows a man that looks extremely similar to the portrait of Generalissimo Cardenas on the right of the bill...but with a slightly different moustache? I'm not sure!


Under UV light there seems to be some bright blotches--that I wasn't sure were supposed to be there! They appear to be "planchettes". Planchettes are sometimes round (like the bluish ones at the top center) or hexahedron shaped like the green splotches are. The green splotches look iridescent sparkly red under normal light. In addition to the UV awesomeness they reflect back and ruin color photocopier-using counterfeiters. 


Hannibal on a 5 dinar Tunisia note. Carthage must be destroyed!


Much like when they end government meetings with "Death to America" in Iran, a long time ago the ancient Roman senate had some wise-guy named Cato who always would end his speeches by saying "Carthage must be destroyed"...and eventually it was...the area where the Carthaginian Empire was located is in an area now called Tunisia.   


OK, where to start on this? There is vertical assemblage of small icons near Hannibal's left shoulder. These are a bunch of tiny holograms showing top to bottom: a Greek key pattern; the flag of Tunisia; the shape of Tunisia; Hannibal; "5" ; a "5" over a very geometric boat; the flag again; and the Greek key tile pattern again. It's a very strong effect with the items looking at some angles like metal foil with no features to rainbow holograms to grey and metallic silver metal foil with extremely fine features.

Even further to the right is a watermark olive tree visible only when holding the bill up to a light.


Some of the holograms turn into a crazy jumble of geometric wavy shapes at certain angles too. 


On the back are two cool features. On the right there is another stripe which is actually 8 rectangles split into 4 pairs. The left rectangles are holographic red and the right ones are holographic copper. If you tilt and turn the bill a little the red turns into green and the pale gold or silver. In the center of the back of the bill you can see flowers: these totally disappear if you tilt the bill. There is also a flower that does the same located above the "5" on the bottom right corner.


WOW! In addition to the previous security features a lot of the foil holograms glow under UV light in all sorts of wild colors. There are also randomly sprinkled security threads in various colors front and back. Very nice.


Liberia 20 Dollar bill.


To the right of the portrait is a silvery circle. This is a printed and embossed anti-copy key (PEAK) that is also referred to as being  latent image peak. Tilting produces three different images: a silver circle; the letters "CBL"; or a star. 


In addition to being a triple-image PEAK the silver circle glows bright yellow under UV light! Various security threads also show up under UV light front and back.


They don't even make these anymore! Yugoslavia dinars.

This is a Yugoslavian 100 dinar banknote from the last year of the country before it broke apart. You will notice that it has no serial number! Yep, 10s and 100s in the final year had no serial number on them.

It does have a nice waffle-pattern watermark.


Thursday, December 10, 2020

GE Clock Radio 7-4725 Repair

 GE Clock Radio 7-4725 Repair


I believe the second number in the date code is the year: 1965, 75, 85 or 95? This is a 1970s clock: so it's probably a 1975.


This clock had an hour hand they stopped advancing and a very loose, wobbly rear setting stem.


The cause was plastic embrittlement, which was caused by the transparent plastic posts that held the clock motor and gears snapping. 


There are two posts, below one is almost dead center in the photo. It is broken in half but still (barely) held in place by a standard (flathead) screw.


This left side screw fits in a cutout notch in the metal plate, not through an actual hole in the plate. This means it isn't really held by anything, and should be pulled out so it doesn't fall into the mechanism.


Below is a photo of the right sided one, also broken in half and also held in place by a flathead screw. 


As you can see, this right side screw does go through the metal plate. So it can be left there, where it will act as a spacer for the metal plate.

This means the plate can't fall too forward towards the front of the clock, but we need to keep the plate from leaning backwards.


The photo bow below shows my thumb almost covering the square hole I put a scree into, and then used to anchor the plate to the inside if the face of the clock.


A screw and a hunk of broken plastic I found rattling around inside the clock as a spacer. At the center of the photo you can see what's left of the broken left post.


I set the time (since the gears now meshed properly) and pushed the stem in until it clicked.

A day later and it was still keeping good time.

Parts needed: Phillips and flathead screwdrivers, 1 screw, hunk of plastic for a washer/spacer, xacto knife to start pilot hole for screw.


That's it, a single screw and ten minutes to fix a clock thats almost older than me!


Tuesday, November 10, 2020

Padlocks, Bump Keys, Hammer loosening


Padlocks, Bump Keys, Hammer loosening


I was down to a few padlocks I couldn't pick, so I tried bump keying them. Place a key inside with an orange o-ring and hit with a black plastic hammer.

I didn't have an actual bump keys (cut zig-zag with highest and lowest cuts alternating) for these particular locks, but used random keys that happened to fit in each lock.


The first was an immediate success! Another "Best" padlock opened in seconds. Tap, tap, tap and open.


The next two locks failed to open while bumping, but I must have jiggled some rust loose or something because they both opened on the first try of picking. This is after two weeks of trying to pick these locks! They're both Master Locks. 


The red one was very "crunchy" while opening. You can see the simple pick I used. After two weeks of trying, then banging with a bump key and hammer--it opened. This red one was last in line because it felt like it only had two pins (the others were stuck apparently).


If you ever have a lock you can't pick--try tapping it with a hammer (and lubricating it). It may just be rusted shut a little. If a padlock is hard to open with a key, then it's going to be impossible to pick open. If you don't have a key (like me) then you can't assume a lock is functioning well enough to be picked.

Monday, November 2, 2020

Master Lock F25 and WB Padlock Lock Picking


Master Lock F25 Padlock Lock Picking (and a WB padlock)


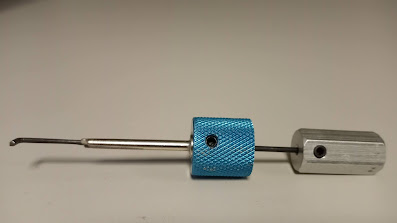
The Master Lock F25 is a warded padlock with a variable height shackle. I did not have the key, and I did not have any warded picks, so for fun I modified a different pick I've never had reason to use.


I bought a $14 two-pick disc detainer lock pick set. One is shaped like a + sign and works great, the second one has a HUGE square end that hasn’t fit into any lock I’ve come across. So, I took the second huge disc detainer pick (not the nice "+" shaped one) and cut the unusable thick "flag" off the end.


Then I bent the wire tip 90 degrees.


Then I cut the blue handle down and ground down the silver tube part down. This gave me extra length. I could have just removed the blue handle part entirely.


This made this especially to pick/bypass this Masterlock F25 warded lock. The F25 has a zig-zag keyway and has a wedge thingy that grabs the indent on the inside of the shackle. There are indents on both sides of the shackle, but only one side of the lock. This way you can place the removable shackle in either way left/right. What is bad is that there is only one wedge-shaped locking thing so it’s much easier to pick than if there was one on each side!


Looking inside the left shackle hole shows the locking mechanism. The right side is a smooth hole which place no part in locking this lock.


The tolerances on the shackle are tight. A padlock shim would work—but there is not enough room to slide one in-between the shackle and the hole it goes into. You would only need to shim one side of the shackle, but you wouldn’t know which side. I consider this padlock to be basically shim-proof.  


The shackle has multiple indents so you can lock it as tall or short as you want. There are four height levels for the shackle to close down to. That’s actually a pretty nice feature!


How do you pick this lock?


I used this modified pick to probe the inside of the lock about halfway down and found the "clicky" spinning part deep down inside. The shackle isn’t spring loaded, so you have to balance holding the spring-loaded wedge open without going to far—and then gently pull the shackle out; or let gravity do it with the shackle facing the floor if there isn’t too much rust.


If you imagine the lock with the keyhole facing the sky and looking down inside there are “ledges” which are the wards. These are non-moving. The second or third one down has the moving spring loaded release mechanism underneath it. Poke the pick into the lock and let it rest on the middle ledge (ward). Carefully move it just underneath so you’re scraping the underside of this ward. Rotate the pick like a key and push and hold the release mechanism to free up the shackle. Scary simple once you figure it out!


Yes, it’s pretty easy with the right tool. In my case I didn’t have any warded lock picks at the time so I made this pick—for fun! A quicker solution would have been one of those Four-For-Three-Dollars Harbor Freight pick sets with the orange handles. The one with the 90-degree bend at the tip probably would have worked just as well. But it might have been a little too long. When I made me 90-degree bend I made the bent tip about half the width of the keyhole. That way I knew it would fit inside and be able to spin.


Luckily, this lock only has one release mechanism. If it had one on either side I would have needed a “T” shaped tip instead of a “7” shaped one. In that case an unmodified disc detainer pick with the square paddle at the end may have worked. Alas, Master Lock did not build it that way. Still a nice lock though. But it’s one you can bypass/defeat without even needing a tension wrench.


I like my solution better because it was more fun.


The wards are non-moving obstacles. You can just work above or below them. They just keep you from being able to jam a popsicle stick or something like that into the lock and turning it. 

However, if you split a popsicle stick in half lengthwise you can twist it gently but firmly in the lock, you would see where the non-moving wards leave an indent and then cut slots in those places: boom, now you have a wooden key for that lock! 

Of course, you’d want to transfer that pattern to something stronger than a popsicle stick, like a stiff piece of plastic or metal. As long as you spin anything that is the width of the keyhole (or half it’s with and hold it carefully) without jamming against a ward it should open the lock.


A quick post script: the demonic WB padlock.


This lock had me beat. It was on my desk for a week. I would fiddle with it on and off in between other projects. The shackle is really long, but also bent. The side of the lock is bulged out a little. I havd no key for it. I figured maybe it was broken?


Then i accidentally put the tension wrench in backwards and tensioned it COUNTER-clockwise. It basically opened right up with almost zero effort! Lefty-loosey-openy!!


I put tension on it and put a simple pick i to the keyway and it turned. Mo effort. Essier to pick than my transparent plastic practice locks.


When all else fails...