Tuesday, July 6, 2021

DIY Easy Double Slit Experiment

DIY Easy Double Slit Experiment


Items needed:

2 paper binder clips (any size)
1 large paper binder clip
2 razor blades
1 sewing needle
1 laser pointer
Wood or cardboard base to stick pin into


Put binder clips on the razor blades so they stand up.

Jam the pin so it sticks upright out if the wood or cardboard base (I used a wooden cigar box).

Put the laser pointer into the large binder clip.

Keep moving the razor blades closer and closer to both sides of the needle. 

The dual nature of photon particles vs wave theory; classical vs quantum physics!

Eventually you'll get interference lines.

Sunday, June 13, 2021

AIPHONE C-ML Intercom Door Lock

 AIPHONE C-ML Intercom and magnetic door unlock wiring system.


Outside the building a delivery person presses the doorbell button on the LE-D unit and lets go. This rings a loud bell on the C-ML.

Inside a security person presses and holds the microphone flip switch on the C-ML and talks into it "how may I help you?" and then lets go of the switch-which in turn activates a microphone on the outdoor LE-D unit.

The outside delivery person has a few seconds to speak "your sandwiches are here!"

The indoor security person can then press the little black door unlock button which cuts power to the magnet holding the door open for a few seconds allowing sandwich to be delivered.

Alternately, a person can swipe a magnetic swipe card in the REI reader, or type in a code on the REI keypad and the door magnet will unlock for a few seconds.

With short runs of wire during testing only 3vDC was needed for the intercom and doorbell to work. I also have a 16.5vAC Revere wall wart that might work on parts of this system-possibly feeding the keyboard logic boards and magnet lock "brain" (still playing around).


Green wire on left, white on right.


When the little black door unlock button is pressed on the C-ML the ohm resistance on the green and white wires change. There is no voltage, this acts as an on/off switch for the door magnet/keypad part. 

There are a lot of wires on the keypad that interface with the unlock button, card reader and the magnet lock. I'll update in a week or two when i open that up and wire it in. 


Left top/Black wire/Door open (ohm continuity)

Right top/White wire/Door open (ohm continuity)

Middle left/Black negative DC power
Middle right/Green to LE-D doorbell


Bottom left/Red positive DC power
Bottom right/White  to LE-D doorbell


Now i have to wire up the keypad "brain" of the system and the keycard slide reader.


"Just slide the sandwiches under the truck...meow."

Thursday, May 27, 2021

Unlock DVD security case with red padlock


Place rare earth neodymium magnets (the super strong chrome looking ones) as shown. Then slide them together at same time.

These were tiny 6mm magnet cylinders from K&J magnets store. I had to double up and use two per side to make it easier.

Slightly larger magnets would have worked even easier. I have some 1" cube N52 that make it even easier, but i wanted to see how small I could go. A single 6mm cylinder on each side might barely work if you practice...but just stack a couple and you're good to go. 

Placement matters. The magnets still still stick on the DVD case of you switch sides, but they won't unlock it.

Bottom of red padlock side = top left.
Top of red padlock = bottom right.

Worst part is pinching your fingers with N52 magnets: very painful 😖


...and here are a couple, slightly larger magnets I sunk into a hunk of scrap wood. Works great:


Monday, March 29, 2021

Updating the BIOS on an ancient Acer Aspire One KAV10 AOD150-1322 laptop running Linux Mint 19.3


Updating the BIOS on an ancient Acer Aspire One KAV10 AOD150-1322 laptop running Linux Mint 19.3 to get rid of a problem when it was booting up and shutting down it would go to sleep multiple times during these processes. I had to keep hitting the space bar and sometimes the power button to wake up the laptop so it could continue shutting down or booting up.


The problem would go away if I went into F2 on boot up and turned off the fast start/quick start/ready start quick boot up feature. But then it would loose this change after one or two boots. So I decided to flash the BIOS to the latest version available (a version from way back in 2012!).

The only reason I did this (it took about 3 hours to get past all the wrong advice online) was because the laptop kept going into sleep/hibernate in the middle booting or shutting down. Only attempt to update BIOS on any machine if there is a need. If it goes wrong BIOS problems tend to be unfixable and you can just throw the computer in the trash!

To do this I needed:

-USB stick.

-The Acer Bios files from the ACER website only (comes with Windows and DOS folder--you have to use the DOS folder files).

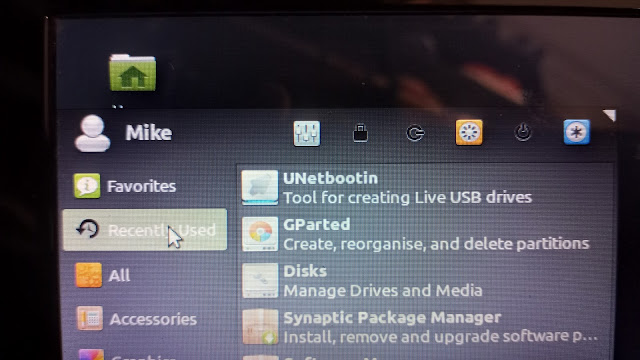
-Unetbootin program loaded.

-GParted program loaded.

-Disks (or Disk Management) program loaded.


Many of the online tutorials are WRONG WRONG WRONG!!!! in their steps. Specifically they tell you: the wrong FAT system, the wrong BIOS file to choose, and a couple other wrong things.


After downloading the BIOS files from Acer and loading the Linux Mint programs on the laptop I was ready to begin.


Formatting the USB stick. First off, many tutorials say to use FAT16 but that never worked for me so I used FAT32. When you name your USB make sure to use  8 or less letters in the name. I named mine "CrazyUSB". Keep the name short or else some of these old DOS things will have an issue!


Also when using the programs you MUST make sure you've selected your USB thumb drive and NOT your computer's hard drive. These programs ALL default to your computers hard drive and then you have to select the USB stick (green selection in upper right corner in the photo).


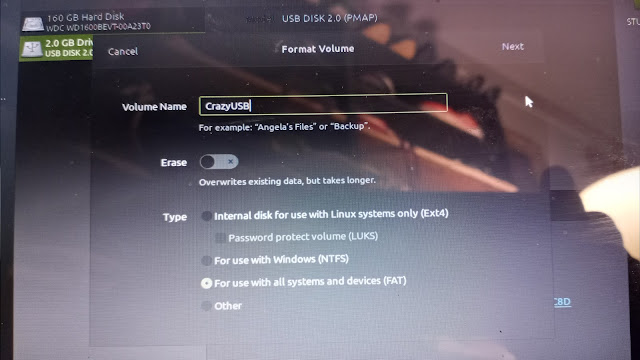
I did this multiple (failed) times and eventually when there was a PARTITION on the USB stick it went better. The USB partition now showed up as "SAFA-CC8D" instead of "CrazyUSB". This is apparently an important change in how the USB stick was formatted. It was still FAT32 but partitioned with Gparted so the above photo may not be the correct way!!! Sorry, but it's all I have.


Look below at this photo. That is what the final, successful USB looked like. But we'll get to that.


After formatting the USB into FAT32 (probably then adding a partition in it) we download the BIOS files from the Acer website. You must go to the Acer website and not some of the other various scam BIOS websites. Acer has it!

The folder might say "Windows" on the outside but when you go inside you want to be working with the DOS files in the DOS folder.


We want the 3 files from the DOS folder (ignore the windows folder).


Start the program Unetbootin and only click the top settings. Select the dot for "Distribution" and select "FreeDOS" and "1.0" and click OK. This downloads and formats FreeDOS to your USB stick.


Here's where things get confusing. Some people say you can just drag and drop your 3 BIOS files (Flashit.EXE, KAV10.BAT and KAV10.FD) but what I did was do start Unetbootin again.

Click to dot the "Diskimage" and select "ISO" and then browse to find the DOS file called FLASHIT.EXE and click ok.

Then I grabbed the other two files (KAV10.BAT and KAV10.FD) and just dragged and dropped them into the USB folder.

To be clear: we are using UNetbootin to LOAD the Flashit.EXE file and closing UNetbootin. Then we are just dragging and dropping the other two files with our mouse.


Finally getting to the actual BIOS update. After getting the computer to boot from the USB properly you'll see a countdown. I had it hang up and keep counting down from 10 seconds and then starting over and over again. It's a blue and grey screen that says "default" on it. Eventually after repeatedly trying slight variations on the above steps I got it to actually bring me to a boot screen where I had choices:

1 was the default (someone said never use that for some reason) so I chose either 2 or 5. I think it was the "5" boot as live disc, etc. 

I finally got to a Insyde bios screen with an "A prompt". You have to change the A prompt to a "C" prompt, and then choose the BAT file (NOT the EXE file) to run.

I was at the A:\> and 

Type C:
Hit enter
You should now have a C:\> prompt
Type KAV10.BAT

Then came this glorious screen:


You can sit and watch the FFFFxxxx blocks updating. It only takes a minute or two. Then your computer will reboot itself.


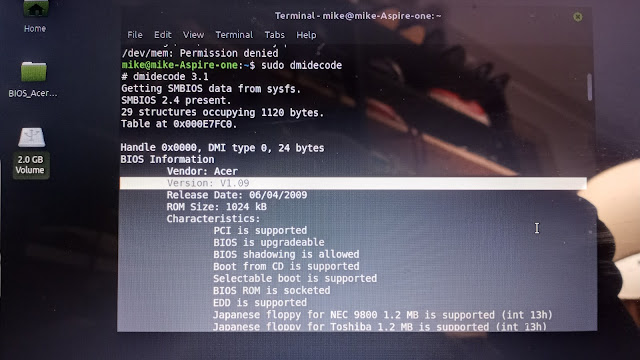
Go into Terminal and type "sudo dmidecode" to view your important stats, including the BIOS which you'll have to scroll up to the top of the list to see.


Success: now it's V1.09 which is the last update to this BIOS as of the year 2021. It will probably be the last BIOS update for the old Acer laptops from the 2000s.


So here are the errors in many online tutorials that I had to get past:

-Fat 32 (not Fat 16).
-Partition Fat 32?
-Use the DOS BIOS folder items (not the Windows BIOS folder items).
-UNetbootin loads DOS 1.0 itself (you don't have to download other DOS things).
-Load the EXE file (don't just click and drag it), but then click and drag the other two files!
-Once at the C prompt type in the name of the BAT file (not the EXE file).

It is pretty impossible to take screenshots while doing DOS/BIOS/Linux stuff like this so it's just cellphone photos that I wasn't intending on using online--just notes in case everything went wrong--which it did for 3 hours. I just pieced back about 98% of I what finally worked. Still hazy on how the USB was formatted to FAT32 (and then partitioned I'm pretty sure also in FAT32 using GParted?).

The only reason I did this (it took about 3 hours to get past all the wrong advice online) was because the laptop kept going into sleep/hibernate in the middle booting or shutting down. Only attempt to update BIOS on any machine if there is a need. If it goes wrong BIOS problems tend to be unfixable and you can just throw the computer in the trash!


Wednesday, February 3, 2021

Micrometeorites (easy to find)!

 Micrometeorites are easy to find!


Tons and tons of space dust (micrometeorites) fall to Earth every day. It lands on rooftops and then gets concentrated in roof gutters and the soil under downspouts. 

Some micrometeorites are tiny glass beads, similar to tektites. Melted glass "raindrops". To find those you can dig up soil and sort through it under a microscope.

A little easier to gather are the relatively rarer--though easier to find--iron containing micrometeorites. Here's how to do it:


1. Put a strong magnet in plastic.

2. Run the magnet in your gutters; on your roof; or around your gutter downspouts.

3. Over a piece of clean white paper take the plastic off the magnet and all the little magnetic pieces of matter will fall off onto the paper.

4. Funnel the matter into a microscope slide (one with a "well" depression will work best) or even a white 3x5" index card.

5. Start your search under the microscope.


You'll have to do some online research to see what micrometeorites tend to look like. They're either perfect spheres or slightly ovoid "bead" shapes. A common problem with hunting under higher magnifications is that most microscopes are set up to view transmissively with light coming from underneath and flowing through the object (usually transparent cellular matter). That will work just great for glass micrometeorites--but for the iron ones (and anything else picked up along the way) things will be silhouetted. Try getting a strong flashlight and aiming it from above the slide. This will help during photographing.

My microscope has two eyepieces--and I've removed one of them and replaced it with a USB camera that came with a suite of video and photo software. These USB cameras can be found online for less than $50. They're nice because you can move the microscope stage around (x and y axis) and also focus (z axis) while staring at your computer monitor instead of hunched over the actual microscope.

The software also lets you take photos and video, annotate things with arrows, add text, adjust the brightness/contrast/color/white balance, zoom in and do all sorts of other cool stuff.

If you don't have all that you can just stick your cellphone right up to the eyepiece and snap a photo. See my other posts of afocal astrophotography for all the cool things you can do on the cheap.


So, what did I find my first trip out micrometeorite hunting? Here's some photos from my microscope:


First will start out with micrometeorites. This shot shows two of them. Most of this photo is dark a silhouette. This is how you will be hunting. To take the photo I shined a really bright Maglite flashlight from above. That flashlight is the only reason you can see the highlights on the left sphere. Other wise it would look flat black.


Flooding the microscope from above with a lamp and a  flashlight. Make sure not to let any of the light get into the second eyepiece or else it will wash out the color.


Even more:


Closeup with light from above:


A real beauty:


This is under higher magnification. For microscopes and telescopes a sad fact of physics is that: the higher the magnification the darker and blurrier the images will be.


Oh yeah:


What is this? I dunno! Probably not a micrometeorite.


This photo is important. See how the right edge has an exposed inner core? A lot of spherical micrometeorites will have that: a exterior with a core slightly exposed. However this isn't a sphere and probably is not a micrometeorite. 


Not a micrometeorite...but it's still neat to see "it"...whatever "it" is. Roof shingle piece? Grit? Sand? Soil? I dunno.


The funny thing is that I overlooked a bunch of micrometeorites accidentally. I was so caught up in looking for tiny spheres that I over looked the huge (relatively) pieces of "unmelted micrometeorites". They look like Michigan Native Copper pieces: like shredded shrapnel pieces. I have a lot of those that stuck to the magnet as well. In fact some of the magnetic "junk" that the spheres in the photos above might actually be iron micrometeorites of the "un-melted" type. Neato!

Researching photos of what you're hunting for is important. Another good thing to look at is "not a micrometeorite" to see what is and isn't.


So yes, in under half an hour you can be finding your first micrometeorites. You just need a strong rare-earth magnet (the silver looking ones usually), a piece of plastic and a microscope. 

Saturday, January 2, 2021

Security Banknote Features


Security Banknote Features


PLEASE NOTE:  THIS POST WILL BE UPDATED WITH MICROSCOPE PHOTOGRAPHS OVER THE NEXT FEW WEEKS! 

Here are some security banknote (money) features used to make counterfeiting more difficult. Just fun junk drawer stuff. Some of these features are obvious when pointed out to regular people. Some of them are invisible unless you use an ultraviolet (UV) light.

Some features like OMRON rings are only supposed to be detected by scanning computer software (like PhotoShop) and color copiers and flatbed scanners which will then automatically refuse to scan or print a copy of the money--but you can see them if you know where to look! Sneaky!


In fact, let's start with the most shocking one: OMRON rings, which are also called the EURion constellation.


OMRON Rings in US money (and many, many, many other countries' money too)!

This pattern of rings is the "EURion constellation" aka OMRON rings. It looks a little like the astronomic constellation Orion. These rings make a precise pattern.


Look at the back of a $5 or $20 bill like in my photo. You'll see a swarm of yellow "05"s or "20"s in a sort of cloud. Here's the tip-off: why would you put a zero in front of the five? 05 instead of just 5? If you take a marker and put a dot in the center of each of the zeros you'll notice then that the zeros make up a bunch of EURion constellations. TRY IT AND SEE (OR SCROLL DOWN)!!!


Anyway, if you try to scan these bills with PhotoShop or a color copier or a flatbed scanner or other high-tech device the device can sense the EURion constellations and it will stop scanning. Theoretically it could stop scanning and contact the authorities. Mostly it just locks up your software or hardware and it refuses to copy and/or print.

There are other bills that similarly lock up software and hardware that don't contain EURion constellations...so there are other patterns out there that act the same way!

Too broke or lazy to connect the dots? Here ya go: a USA $20 bill with the EURion constellation filled out in the zeros. 


Here is a really nice Iraq 25 dinar banknote showing Saddam Hussein.


Here is the the 25 dinar under ultraviolet (UV) black light. Along with the stunningly beautiful color changes to the front and a cleaner, less cluttered looking back we see the glowing aqua-colored Arabic 25 next to Saddam's right shoulder. On the back is the pear-shaped Al-Shaheed Monument in Baghdad. It is dedicated to the Iraqi soldiers that died in the Iran–Iraq War. There are a lot of people who invest in Saddam dinars--because they are getting scammed! The were only worth around 4000 dinars for a single USA dollar. Generally when a country has a living guy on their money and that living guy gets executed that money is then worthless!


Ukraine hryvnia (hryvna, or sometimes hryvnya) in two denominations. 


Both these Ukrainian bills feature intricate background patterning that is created by a single, continuous line. This fine printing is hard to duplicate and hard to photocopy. Guilloches are wavy geometric patterns that follow mathematical formulae. Guilloches and just fine lines are used in most banknotes. 

These bills also have very brightly glowing UV inks in rather large areas on the fronts and UV threads sprinkled on their backs. Strangely the 5 hryvnia note basically sticks with yellow and a yellowish green, the cheaper 1 hryvnia note at a glowing pink UV ink into the mix--although both notes use a beautiful orange UV ink for the serial number on their backs. 


The glorious 1000 ouguiya note from Mauritania!


Where to start on this wonder of technology. It's a polymer banknote that feels like plastic (not paper) in your hands. In the upper right you will notice a set of 12 depressions (raised bumps on the back). These are braille dots and a "tactile" feature. 


There is dynamic color-shifting ink on the front right that is overprinted on a clear viewing window! The pattern is a central red triangle with two green wings that change depending of the angle of the viewer to a red triangle with a blue and a yellow wing. This is effect is made by Innovia Security and is called an "optically variable element with a polychrome effect aurora". It's layers of semi-transparent pearlescent inks. They look different if the light source is behind or in front of the banknote. 


There is also some very nice overprinting of circles at the bottom of the bill.


There is an extremely bright block of UV ink showing the 1000 denomination on the back and a very subtle glowing of the serial number too.


A very busy 10 dollar Hong Kong note.


The Hong Kong polymer note is very light and plastic feeling. Very slick and weird.


We have another transparent window with an overprinting of something similar to optically variable element ink. It's called Dynamic Color Shift G-Switch and the colors go from pink of blue to a coral orange to a beautiful pearlescent lavender. You have to work to get the effect buy spinning the dollar around and tilting it and walking around the room--but when it happens it's very impressive! I still don't know what the ribbon (?) or eel (?) color changing thingy is on top of the bauhinia flower. 


What the blue splotch turn into a horse when held up to the light.


A half pink and half blue horse (or unicorn?) shows up. The blue half is printed on the front and the pink on the back. 


You also get a huge blast of UV ink denoting the "10" dollars. Very bright white square. 


Here's another super-bill: a polymer Mauritius 50 rupee bill that's got a lot going on.


The optically variable ink with color shift effect has a "swing" effect element to it. Look at the right of the note and you'll see a white dodo bird with "RS 50" printed on a clear window. Moving the bill and light sources makes the "RS" turn blue and turning it another way makes the "RS" turn yellow. The same for the "50" --it can be white, blue or yellow too!


More raised braille dots called a "tactile feature". On Canadian money it's much easier: a block of 6 dots equals $5. Two blocks of 6 = 12 dots = $10. Yes, 6 = 5! Ugh!!!!


Nice center block of UV ink and other spots too, including the serial number.


Under UV light the back of the bill has a glowing "50" and the word "Bom" repeated over and over so it looks like "BOMB". Maybe they were Ricky Martin fans "shake your bom bom" --LOL!


The Bom Bom shows up if you tilt the bill just right as very similar to a glossy spot printing, like on some hardcover books. It looks like it's printed in perfectly clear ink laying on top of the bill--until you turn a UV light on.


Behold the glorious 5000 peso note of Mexico!


This 1985 note has seen a rough life, but under UV light it does glow--uranium yellow racing stripes all along the back. Kinda neat, but I'm not even sure it's really a security feature, it might have just been some ink that also happened to fluoresce. I look at pieces of junk mail under a UV lamp for fun and sometimes things light up.


What are the odds of another 1985 Mexico banknote--and this one is 10,000 pesos!


Hmm.. what's that suspiciously empty area to the left for? A watermark that shows a man that looks extremely similar to the portrait of Generalissimo Cardenas on the right of the bill...but with a slightly different moustache? I'm not sure!


Under UV light there seems to be some bright blotches--that I wasn't sure were supposed to be there! They appear to be "planchettes". Planchettes are sometimes round (like the bluish ones at the top center) or hexahedron shaped like the green splotches are. The green splotches look iridescent sparkly red under normal light. In addition to the UV awesomeness they reflect back and ruin color photocopier-using counterfeiters. 


Hannibal on a 5 dinar Tunisia note. Carthage must be destroyed!


Much like when they end government meetings with "Death to America" in Iran, a long time ago the ancient Roman senate had some wise-guy named Cato who always would end his speeches by saying "Carthage must be destroyed"...and eventually it was...the area where the Carthaginian Empire was located is in an area now called Tunisia.   


OK, where to start on this? There is vertical assemblage of small icons near Hannibal's left shoulder. These are a bunch of tiny holograms showing top to bottom: a Greek key pattern; the flag of Tunisia; the shape of Tunisia; Hannibal; "5" ; a "5" over a very geometric boat; the flag again; and the Greek key tile pattern again. It's a very strong effect with the items looking at some angles like metal foil with no features to rainbow holograms to grey and metallic silver metal foil with extremely fine features.

Even further to the right is a watermark olive tree visible only when holding the bill up to a light.


Some of the holograms turn into a crazy jumble of geometric wavy shapes at certain angles too. 


On the back are two cool features. On the right there is another stripe which is actually 8 rectangles split into 4 pairs. The left rectangles are holographic red and the right ones are holographic copper. If you tilt and turn the bill a little the red turns into green and the pale gold or silver. In the center of the back of the bill you can see flowers: these totally disappear if you tilt the bill. There is also a flower that does the same located above the "5" on the bottom right corner.


WOW! In addition to the previous security features a lot of the foil holograms glow under UV light in all sorts of wild colors. There are also randomly sprinkled security threads in various colors front and back. Very nice.


Liberia 20 Dollar bill.


To the right of the portrait is a silvery circle. This is a printed and embossed anti-copy key (PEAK) that is also referred to as being  latent image peak. Tilting produces three different images: a silver circle; the letters "CBL"; or a star. 


In addition to being a triple-image PEAK the silver circle glows bright yellow under UV light! Various security threads also show up under UV light front and back.


They don't even make these anymore! Yugoslavia dinars.

This is a Yugoslavian 100 dinar banknote from the last year of the country before it broke apart. You will notice that it has no serial number! Yep, 10s and 100s in the final year had no serial number on them.

It does have a nice waffle-pattern watermark.