Here is my new Taig Microlathe II with a binocular microscope attached to it.
The microscope is a Swift 2x/4x mounted on an arm that I made out of plate steel and aluminum tubing. It has an LED illuminator and almost the entire microscope is made out of metal!
Taig lathes are still MADE IN AMERICA and are extremely high precision instruments.
View through the microscope at 2x:
Actual size view:
The microscope is removable for safe keeping. I mounted the lathe onto a filecabinet drawer type thing and filled it with the accessories: milling attachment, tools, measurement devices, etc.
The initial order to Taig was for:
1017#3 Starter Set #3 - Base + 5C Headstock
1096 Unground tool bit 1/4" square
1170 Extra Tool Post 6
1171 Back Tool Post 2
1110 Slitting saw arbor
1232 1/4" Diameter Milling Cutter
1230A 1/16 dia Milling Cutter
1230C 1/8 dia.Milling Cutter
1111 Hi Speed Slitting Saw
1152 Die Holder for Tailstock
1224 Fly Cutter
1210 Radius Turner
1038 4 inch swivel joint tool rest (wood turners)
1190 Steady Rest
1225 Milling Vice
1173 T Bar Cutoff Tool
1200 Top Slide Mounts 1220
Milling attachment
300-82 (T-Bar Cutoff Mount)
Tons of other tools, bits, bit steel to grind my own cutters, calipers, dial indicators, raw metal stock, etc. are on their way too.
The first learning goal is to take an existing watch movement and replace it piece-by-piece with pieces that I manufacture. Replacing steel with brass, until I've made a complete movement. See you in a few years...
The chosen movement is an ETA 6498 M03 that was introduced in 1950. It's a pocket watch movement. ETA's website is awful and always down for service. If you need the tech specs for this movement do a search for "'CT_6498-2_FDE_482480_08" and there will be a few results.
Tons and tons of space dust (micrometeorites) fall to Earth every day. It lands on rooftops and then gets concentrated in roof gutters and the soil under downspouts.
Some micrometeorites are tiny glass beads, similar to tektites. Melted glass "raindrops". To find those you can dig up soil and sort through it under a microscope.
A little easier to gather are the relatively rarer--though easier to find--iron containing micrometeorites. Here's how to do it:
1. Put a strong magnet in plastic.
2. Run the magnet in your gutters; on your roof; or around your gutter downspouts.
3. Over a piece of clean white paper take the plastic off the magnet and all the little magnetic pieces of matter will fall off onto the paper.
4. Funnel the matter into a microscope slide (one with a "well" depression will work best) or even a white 3x5" index card.
5. Start your search under the microscope.
You'll have to do some online research to see what micrometeorites tend to look like. They're either perfect spheres or slightly ovoid "bead" shapes. A common problem with hunting under higher magnifications is that most microscopes are set up to view transmissively with light coming from underneath and flowing through the object (usually transparent cellular matter). That will work just great for glass micrometeorites--but for the iron ones (and anything else picked up along the way) things will be silhouetted. Try getting a strong flashlight and aiming it from above the slide. This will help during photographing.
My microscope has two eyepieces--and I've removed one of them and replaced it with a USB camera that came with a suite of video and photo software. These USB cameras can be found online for less than $50. They're nice because you can move the microscope stage around (x and y axis) and also focus (z axis) while staring at your computer monitor instead of hunched over the actual microscope.
The software also lets you take photos and video, annotate things with arrows, add text, adjust the brightness/contrast/color/white balance, zoom in and do all sorts of other cool stuff.
If you don't have all that you can just stick your cellphone right up to the eyepiece and snap a photo. See my other posts of afocal astrophotography for all the cool things you can do on the cheap.
So, what did I find my first trip out micrometeorite hunting? Here's some photos from my microscope:
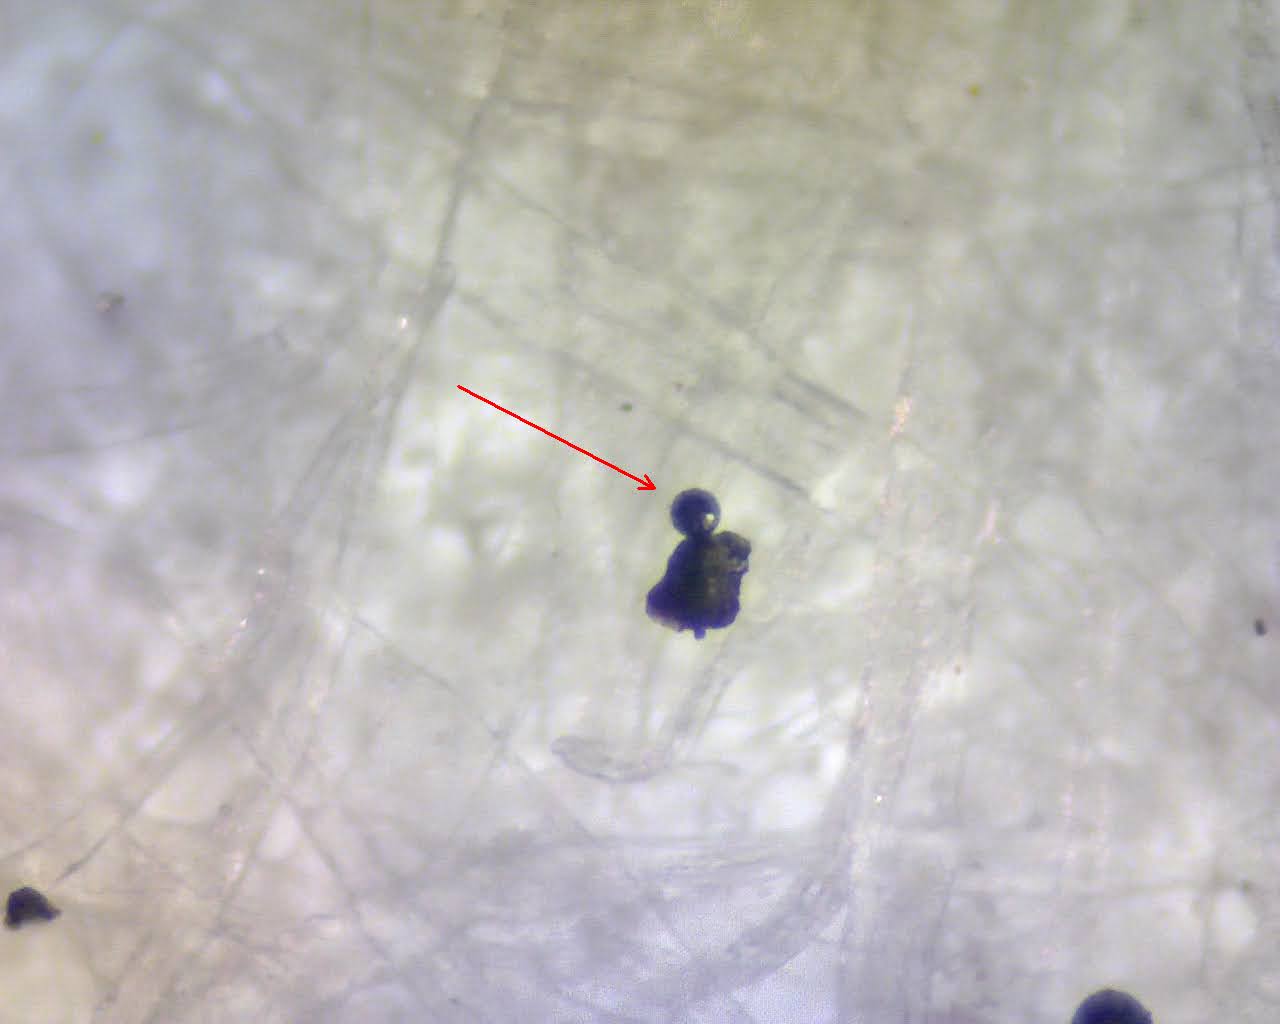
First will start out with micrometeorites. This shot shows two of them. Most of this photo is dark a silhouette. This is how you will be hunting. To take the photo I shined a really bright Maglite flashlight from above. That flashlight is the only reason you can see the highlights on the left sphere. Other wise it would look flat black.
Flooding the microscope from above with a lamp and a flashlight. Make sure not to let any of the light get into the second eyepiece or else it will wash out the color.
Even more:
Closeup with light from above:
A real beauty:
This is under higher magnification. For microscopes and telescopes a sad fact of physics is that: the higher the magnification the darker and blurrier the images will be.
Oh yeah:
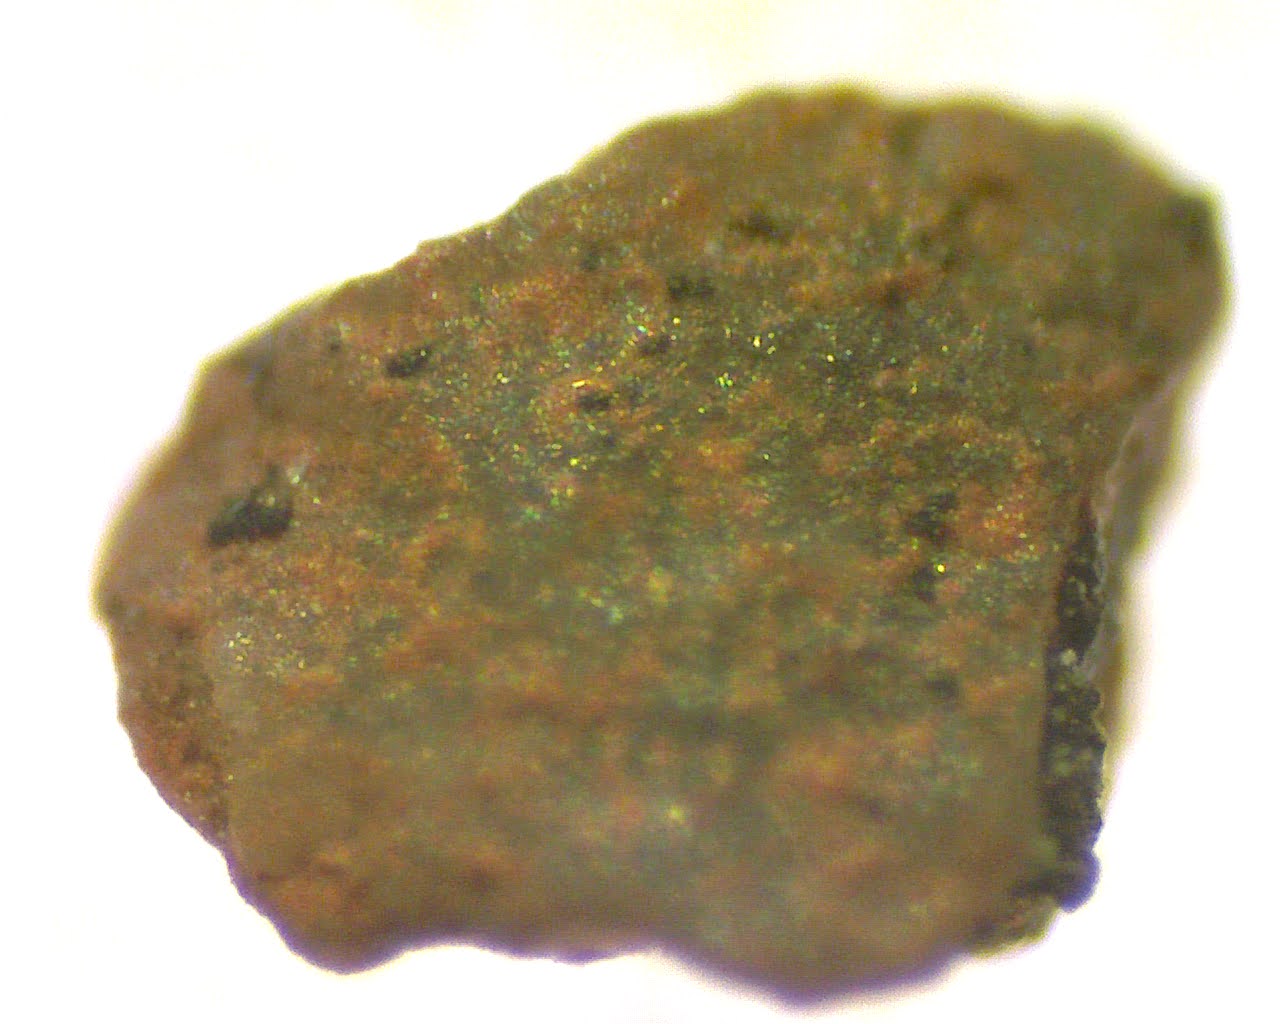
What is this? I dunno! Probably not a micrometeorite.
This photo is important. See how the right edge has an exposed inner core? A lot of spherical micrometeorites will have that: a exterior with a core slightly exposed. However this isn't a sphere and probably is not a micrometeorite.
Not a micrometeorite...but it's still neat to see "it"...whatever "it" is. Roof shingle piece? Grit? Sand? Soil? I dunno.
The funny thing is that I overlooked a bunch of micrometeorites accidentally. I was so caught up in looking for tiny spheres that I over looked the huge (relatively) pieces of "unmelted micrometeorites". They look like Michigan Native Copper pieces: like shredded shrapnel pieces. I have a lot of those that stuck to the magnet as well. In fact some of the magnetic "junk" that the spheres in the photos above might actually be iron micrometeorites of the "un-melted" type. Neato!
Researching photos of what you're hunting for is important. Another good thing to look at is "not a micrometeorite" to see what is and isn't.
So yes, in under half an hour you can be finding your first micrometeorites. You just need a strong rare-earth magnet (the silver looking ones usually), a piece of plastic and a microscope.
These are little black balls I found inside of an old hard drive I just took apart. They are charcoal. Activated charcoal pellets to be exact. Like tiny versions of the charcoal briquettes you might use in your barbeque grill, which were invented by Henry Ford.
You burn something with carbon in it (most things in the universe) while providing lots of oxygen. The result is very porous charcoal. The pores are shallow like the dimples on a golf ball. They increase the surface area and help soak up poisons and other contaminants like gases in the air.
In hard drives they're in a little cup with a vent on one side and gauze on the other. This acts as an air filter for the hard drive. I had the same setup for my aquarium when I raised pufferfish! A gauze pouch with charcoal pellets for cleaning the water.
SiliCON vs SiliCONE vs Carbon
The carbon pellets are also super bouncy. Like, oddly bouncy. Way more than the polymer ball we made a few posts back. That surprised my, but a quick glance at the Periodic Table shows that carbon lives right above silicon, which you'll remember from the non-Newtonian fluid and polymer post and the fast that it's what makes Silly Putty so bouncy...well, that's silicone with an "e" at the end polymer made from silicon. Carbon forms much more stable bonds than silicon, but it likes other carbons to bind to. Silicon likes oxygen, and although it's less stable than carbon bonds silicon plenty of molecules-great molecular subunits linked together (very bouncy). Silicone rubber (which is a silicon polymer) has a Young's Modulus of 0.001 and carbon is less elastic at 4.1.
Balls bounce one way, balls bounce the other way. Meow.
Here is one on the xyz stage of my microscope. The white disk is actually the other side of the black cup/filter assembly it was in with a zillion of its pals. A little ways below I have a better photo of this cup.
Here's some various videos made with 3 different cameras, a very nice microscope and some really terrible out-of-sync lighting. This gives a good sense of their miniscule size.
The very same from my previous video: little black balls I found inside of a hard drive I just took apart.
They are charcoal. Activated charcoal pellets to be exact. Like tiny versions of the charcoal briquettes you might use in your barbecue grill, which were invented by Henry Ford.
They're in a little cup with a vent on one side and gauze on the other. This acts as an air filter for the hard drive. I had the same setup for my aquarium when I used to raise Figure-Eight pufferfish!
In this video I put them under a very nice microscope...but with a very cheap ($1.99 used) webcam and terrible side lighting. My microscope has very, very, very good lighting for looking at slides and other things properly prepared for microscopy with the light coming from *underneath* the slide-not from the side.
Also a point of annoyance: I was testing a crappy webcam (an ancient GE model) that I bought used for $1.99. The flicker is from the LED flashlight not syncing with the webcam.
So, a lot of ugliness on this one. Check my other videos for better cameras (a big Canon in HD, but also my cheap Samsung cellphone and Nexus tablet have way, way, way better video than this GE webcam).
This video was: cheap camera, cheap flashlight just as a quick peak. On the blog post I'll put some better looking still photos.
For a $1.99 I finally have a webcam. At some point I might bash the lens off of it and point its CCD array straight into a dark container with a photo-amplifier tube / scintillator in it to create an alpha particle radiation detector. Sort of like the alpha spark detector I made a video of, only digital.
The microscope is actually very nice (stereo eyepiece, xyz stage, abby condensor, LED with electronic dimming switch and various mechanical shutters for dimming and changing the incidence angle of the light, 2000x oil immersion lens: basically all the bells and whistles and the highest reflected normal light magnification physics allows! All coupled (today only) on a webcam that costs less than a can of Red Bull, lol.
I was also holding the webcam with one hand while moving the xyz stage and focusing with the other--I'm being terribly unprofessional today. I actually have a side illuminator for microscopes that I could have used also. It has a nice (non-harsh, non-flickering light) but this was only a test and with the lousy webcam it would't have made much of a difference.
I kept changing video cameras, but kept the lousy lighting.
Speaking of old technology, I also found this cool brochure for coin operated computers for our library. Pineapple Computers!
Neat, but my computer glows in the dark!
I don't care about the black balls, but I need you to make sure none of these old hard drives have any snakes in them! Mee-yow!
A
little about my first GOOD (utterly fantastic!) microscope. I got it off
Amazon: it’s an OMAX 40X-2000X Lab LED
Binocular Compound Microscope with Double Layer Mechanical Stage and Coaxial
Coarse/Fine Focusing Knob. They have many similar models, but if you search
on the previous, bold font sentence it should bring up what is a great microscope
for the casual user who is sick of garage-sale microscopes.
It's resting atop a $5 DAV (Disabled American Vets Resale Shop) power unit. The power unit is just like a powerstrip that you throw on the floor, only it's in a neat box and each of the 5 plugs have their own on/off switch. I flip the main switch and all my gear comes on. The "printer" switch I leave off until I want to make a black and white Dell laser copy of something--it sure beats crawling behind the desk and reaching to the back of the printer and trying to feel where the power switch is! Aux2 powers the microscope, which has a very bright and cool to the touch LED lamp. Cool to the touch is important because some microscopes have hot halogen lights that can fry and kill any bacteria, etc. that you're viewing. Also LED lasts for ever, halogen bulbs require frequent replacement-which is annoying.
My first degree had a concentration in photography and I have built and used optical systems before. One of the first book covers I updated in my art department job at a major publishing company was the one above. I had to find a clip-art microscope and change it to match the blue color used in the series. Everywhere I go: optics, optics, optics! Anyway, I
wanted something to play with when it was too cloudy for playing telescopes, or practicing on my carbon fiber cello (home-made modification of an old Kay cello). You can skip down to neat photos if you're not shopping for a microscope.
First: the highest magnification objective lens is oil
immersion only. You must put a drop of oil on your slide cover and then lower
the lens into the oil to focus on anything. You must NOT do that with the other
three lenses. This is what allows the 2000x magnification: light goes
through oil instead of unsteady air. It's a fantastic feature at this price.
Don't worry though, you can be happy just using the other 3 lenses, which is
what I plan on using mostly.
**If you're thinking about buying a microscope and you
didn't know what oil immersion objective meant-now is the time to research
'microscopy techniques' along with 'microscope slide preparation' and 'cell
staining' techniques and 'dark field' vs 'light field'-- illumination'. I chose
the LED light because: they run cold so it won't kill live pond cells like a
hot halogen would. They also last longer.
So, how
is this scope? Well it's better than what I used in high school and Chem I in
university. It's way better than my 4 cheapie Tasco-style garage sale scopes
and my homemade macro-bellow system.
This is part of my Frankenstein-scope system. Basically .99cent junk I bought at various garage sales that still did pretty well for taking afocal microphotographs. For a discussion on how easy and cool afocal photography is check my previous blog posts.
The above photos of a fruit fly were taken with the GARAGE-SALE microscope. Not too shabby, but the Omax does a LOT better as you'll soon see. I caught the fruit fly by setting a flat saucer filled with apple cider vinegar next to a pineapple.
I took this image with my cellphone held up to the eyepiece of a .99 cent microscope aimed at a laundry dryer sheet at around 50x magnification. Not bad for less than a buck!
...NOW BACK TO THE GREAT NEW MICROSCOPE
Assembly
was easy: loosen knob at top to remove top cover. Remove clear cap on underside
of head unit. Place head unit on top of scope and re-tighten knob. Pop in the
eyepieces: my 20x were **really** tight and hard to install, but it's 40
degrees here and the metal holes that they fit into may have contracted a bit.
Just be patient and they'll go in. That's it!! Oh, and plug it in for light.
The
objectives are relatively parfocal, meaning when you switch between them you
only have refocus using the fine-focus knobs a little. Great feature which
makes using it even more of a pleasure. There is a dimmer switch for the LED,
and also a diaphragm under the stage-which was half closed when shipped: slide
it open for even more light. Again, if you don't know what these terms mean you
should start researching 'how to use a microscope'.
Optics
appear flat and focused edge-to-edge, which is the opposite of many telescope
mirrors I deal with, but that's another story. Each eyepiece spins for diopter
adjustment, and the eyepieces slide apart for interpupillary adjustment. Focus
with one eye closed using the focus knobs, then switch eyes and focus that eye
buy turning that eyepiece itself. Now open both eyes: both will be focused but
you'll have double vision: slide the eyepieces further and closer apart. At
some point the double vision goes away and in a snap you get a very wide-field view:
a single view. It a little like those 'magic eye' optical illusion posters:
once you get it-you get it. But it might take a few minutes of fiddling.
I love
this microscope, and wished I had bought it years earlier.
On the left side, under the stage is a little black knob that raises and lowers the condenser. Once you've focused--use this knob to back the condenser away from the slide and you'll increase contrast. This helps a lot, especially when things are too washed out with light--and it increases contrast--where just dimming the LED would make everything darker and harder to see.
Basically this is a 'real' microscope, and you should learn how to operate it
in the proper manner to use it at its fullest. With that said, except for the
4th lens they throw in (oil immersion) a little kid could easily figure out all
the features. There is supposed to be a slip of paper with address to download
a manual-but I didn't see it. There are tons of Omax videos on you tube if you
need help.
So, what did I look at with my awesome new telescope? You'd think since I live thirty feet from the Rouge River I'd take a water sample like we did in 5th grade and check that out, but no. I ordered some diatomaceous earth from eBay via a vendor named armed_forces_insignia. I received a two packets of white powder very similar to the stuff you dump into swimming pool filters and gardens to kill snails, actually it's pretty much the exact same stuff except one packet was freshwater diatoms and the other were from salt water locales.
I found this round little diatom with my microscope. I believe it is a variety of stephanodiscus. Diatoms are tiny hard shelled beasts that make up diatomaceous earth. Soft-skinned bugs also hate crawling across these (dead) things because they're shells are like broken glass so people use this in their gardens. They come in gillions of different shapes and collecting them can be a life-time hobby. A hobby you can keep on just a microscope slide or two.
Here are some barrel-shaped diatoms from the same samples. This is even more fun than stamp collecting!
I took a video of this cute little guy, gal? It was in the murky tap water that my avocado-pit growing in a styrofoam cup.
This is the inside of a regular old poppy seed that I left on a wet piece of paper towel for a couple days! You can see the life waiting to jump out of it!
The last three photographs show increasing magnification of some yellowish-green pollen that coated my car in Metro Detroit on 5-17-2015. You can see that as the magnification goes up it gets harder to focus on the entire piece of pollen: microscopes love flat things under cover slips--they have a hard time with "3-d" objects. Be warned, even the ink laying on top of a dollar bill looks like a huge cliff under high magnification. You can usually feel the ink on crisp, new dollar bill--under a microscope you can see the massive depth of the ink on top of the paper and you can only focus on the ink or the paper, not both.
Finally, here are some cat hairs at 1200x under my Omax microscope.
Remember, if you put a cover slip over these hairs and a dollup of oil on top of that you can ram the oil immersion scope into this and get 2000x magnification! Anything you can grab and fit under your microscope can end up being really cool to look at.